

But paddling is personal. Your body, your technique, your goals, your spirit journey on the water — they all matter.

New kayaks and canoes are getting very expensive! The cost of importing - shipping, duty and taxes, the cost of materials and labour, cost of commercial/retail space and staff costs (especially weekends when most want to go paddling). If you are buying a kayak that is coming from overseas, what happens if it arrives damaged? Importers should carry (very expensive) insurance policies to deal with these circumstances. Kayak shops are disappearing as the cost of living increases.
Secondhand is a great option that really should be considered!
Are you ready for a new opportunity that provides you working experience while kayaking through the world’s most liveable city?
Based on the bay of Port Melbourne, East Coast Kayaking and Sea Kayak Australia is recruiting qualified kayaking instructors to travel along the open waters and lead tours as the head instructor.
One thing comes first: never wear cotton outdoors. “Cotton kills” exists for a reason. Once cotton gets wet, it stays wet, gets cold fast, and robs your body of warmth. Your old everyday Bonds socks are out straight away — and the same goes for cotton jocks and underwear as well, before woollen and fleece underwear it was considered bad luck to wear underwear during paddle sports.
I’ve been paddling since 1996, and one thing I’ve learned is that I do not like wet feet.
Personal Protective Equipment (PPE) is essential in paddle sports. Over many years of commercial operations, most of our minor medical incidents have involved foot injuries — everything from cuts and bruises through to stepping in fresh dog poo!
For us, the beach and waterways are a workplace, and workplace safety requirements mean closed-toe footwear must be worn at all times. What you choose to do with your family or in your own time is completely up to you — but from a professional and safety perspective, proper footwear matters.
Paddlesports Weather Forecasting for enclosed and coastal waters - using the Australian Government Bureau of Meteorology website.
This is how the team at East Coast Kayaking now navigates the BOM web page for paddlesports on enclosed and coastal waters after their $96M upgrade - Nice work team…Basically what we are doing is accessing the old site! And bypassing the new one!
It is always good to save your links and create hot links.
1. We Google search:
MetEye - Click on MetEye to see the forecast winds for the next week.
2. Next click on VIC Drop Down and or NSW, QLD, WA, SA, TAS, ACT, NT depending on where you are paddling and choose option Forecasting.
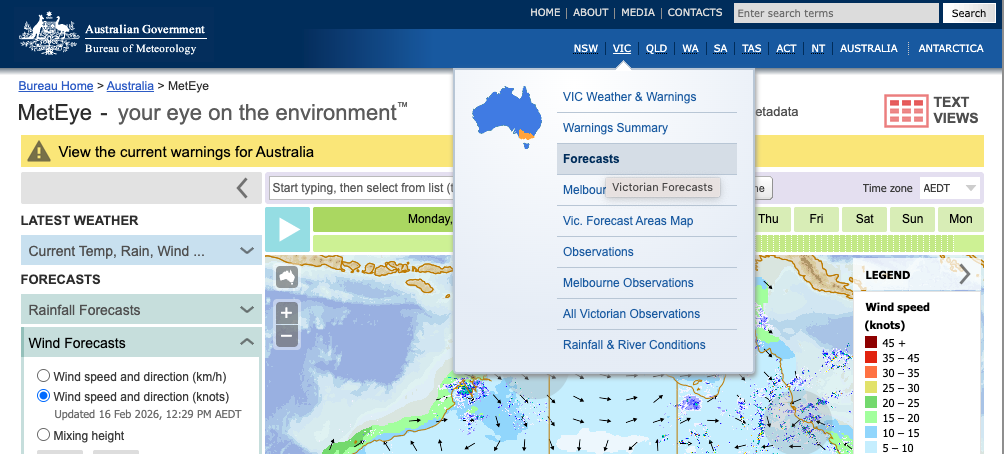
And we are back to the old web page and access Marine Areas - the best resource for your enclosed and coastal paddlesports weather forecasting!
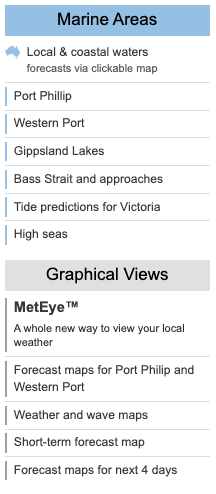
Under Marine Areas, select the area you will be paddling - either from the list or via clickable map. The wind is the thing - check for any marine wind warnings!
You can also access MetEye from this page under Graphical Views (zoomed in to a local area).
Now you have to work out if they have got it right, referring to the wind strength and direction, and they usually do. Wind is pressure and pressure is measurable and they generally do a good job of interpreting it, but you do have to make sure you trust it before you leave the beach, that the actual wind is matching the forecast predictions.
It's better to be on the beach wishing you were out paddling than out paddling and wishing you were on the beach!
We do use multiple sites to do our weather forecasting. Let us know if you enjoyed this and we will write more for you.
NB - “Please be aware” - and I have seen this happen a couple of times! (A warning resulting from 1998 Sydney to Hobart Yacht Race events).
Always plan for the worst and hope for the best…
Come to East Coast Kayaking and learn with us.
Click to image to view BOM Learning Centre.
I usually get about 2 years out of the gaskets on my Kokatat Goretex Meridian Dry Suit. Gaskets are effectively a consumable item and even with care you can expect to replace them at some point if you use your dry suit regularly for sea or river paddling, kayak fishing, even SUP.
Well… Like anything to do with paddle sports, this is general in nature and is my opinion... My points of view are constantly changing as I paddle more and as many different crafts that I can and in differing locations and environments, and with different pods of people. We do recommend that you undertake training with a qualified Paddle Australia Instructor or Sea Guide and Sea Leaders. Please do let us know what you are thinking as it helps others out there!
Mosquitoes and sandflies seem to lurk in the most picturesque outdoor locations, particularly when the weather starts to warm up!
These days mosquitoes potentially carry some nasty diseases, both in Australia and in other part of the world. You want to give yourself the best chance of avoiding these diseases by not getting bitten.
To get the best protection from your mosquito net you want one that has a fine mesh and is Permethrin treated to repel the little bites!
Permethrin is a very safe and effective insecticide, that will daze mosquitoes on contact. With repeated contact the insect will die. The dosage used on these nets has not been found to harm humans; however, if you have concerns please consult your medical practitioner. Permethrin treatment will dissipate with time and washing. You can renew the Permethrin treatment using a kit such as De-Bugger.

Dusky Sound, Fiordland NZ - sandflies tolerated with the aid of SeaToSummit Mosquito Headnet
We use the SeaToSummit Mosquito Head Net with permethrin treatment. On our expedition to the Fiordland area in NZ we gave our nets a real workout! It is an awesome area but it is also the sandfly capital. See our Youtube for tips on avoiding bites and just to see the magnificent scenery we paddled through!
When it comes to DEET less is more! Where possible, do not put insect repellant directly on your skin - it is better to roll it on your hat, socks, the cuffs of your pants & shirt and around your collar. Repel’s range of roll-ons and gel sticks have 30% DEET - this is plenty!
DEET also dissolves plastics - be very careful of it around your plastic kayak, watch band and the knobs on your car radio (yes really!).

Repel Roll-on 30% DEET
There are non-DEET alternatives. A new repellant called Picardin is the active ingredient in Repel New Era.
Loose clothing with a fine weave is better at protecting from mosquitoes than skin-tight clothing that mosquitoes can bite right through. Once you are off the water and in camp it is quick to pull on a pair of Cargo Pants (or over-pants if it is a cool or windy day) to keep wind and biting insects off your legs.
If camping or travelling in tropical or mosquito-prone areas you can prepare your camp clothes ahead of time with De-Bugger Permethrin treatment.
Fine mesh is essential in a tent for insect protection. If you are not in a tent - if you like to tarp, or if you are in the tropics in hard accommodation but want more insect protection, then a mosquito net is ideal. They are available in single or double sizes, to go over your bed or sleeping system and can be rigged to hang from your shelter or the centre-line rope on your tarp.
For extra protection you can also treat your mosquito net with De-Bugger Permethrin treatment.
Even with all these precautions, some of us will still get bitten because mozzies and sandflies just love us!
Formerly I relied on Stingose and Lavender Oil (smelled nice!) but now there is a new product that works effectively to reduce the swelling and itch. It is a battery-operated device called Bite-Away, which works by heating the area of the bite to 51°C (hurts a bit!) for 3 or 6 seconds. This denatures the proteins that cause the histamine release, so it reduces the amount of itch and swelling. You may need to do this more than once but do it before you scratch the top off the bite..


New kayaks and canoes are getting very expensive! The cost of importing - shipping, duty and taxes, the cost of materials and labour, cost of commercial/retail space and staff costs (especially weekends when most want to go paddling). If you are buying a kayak that is coming from overseas, what happens if it arrives damaged? Importers should carry (very expensive) insurance policies to deal with these circumstances. Kayak shops are disappearing as the cost of living increases.
Secondhand is a great option that really should be considered!
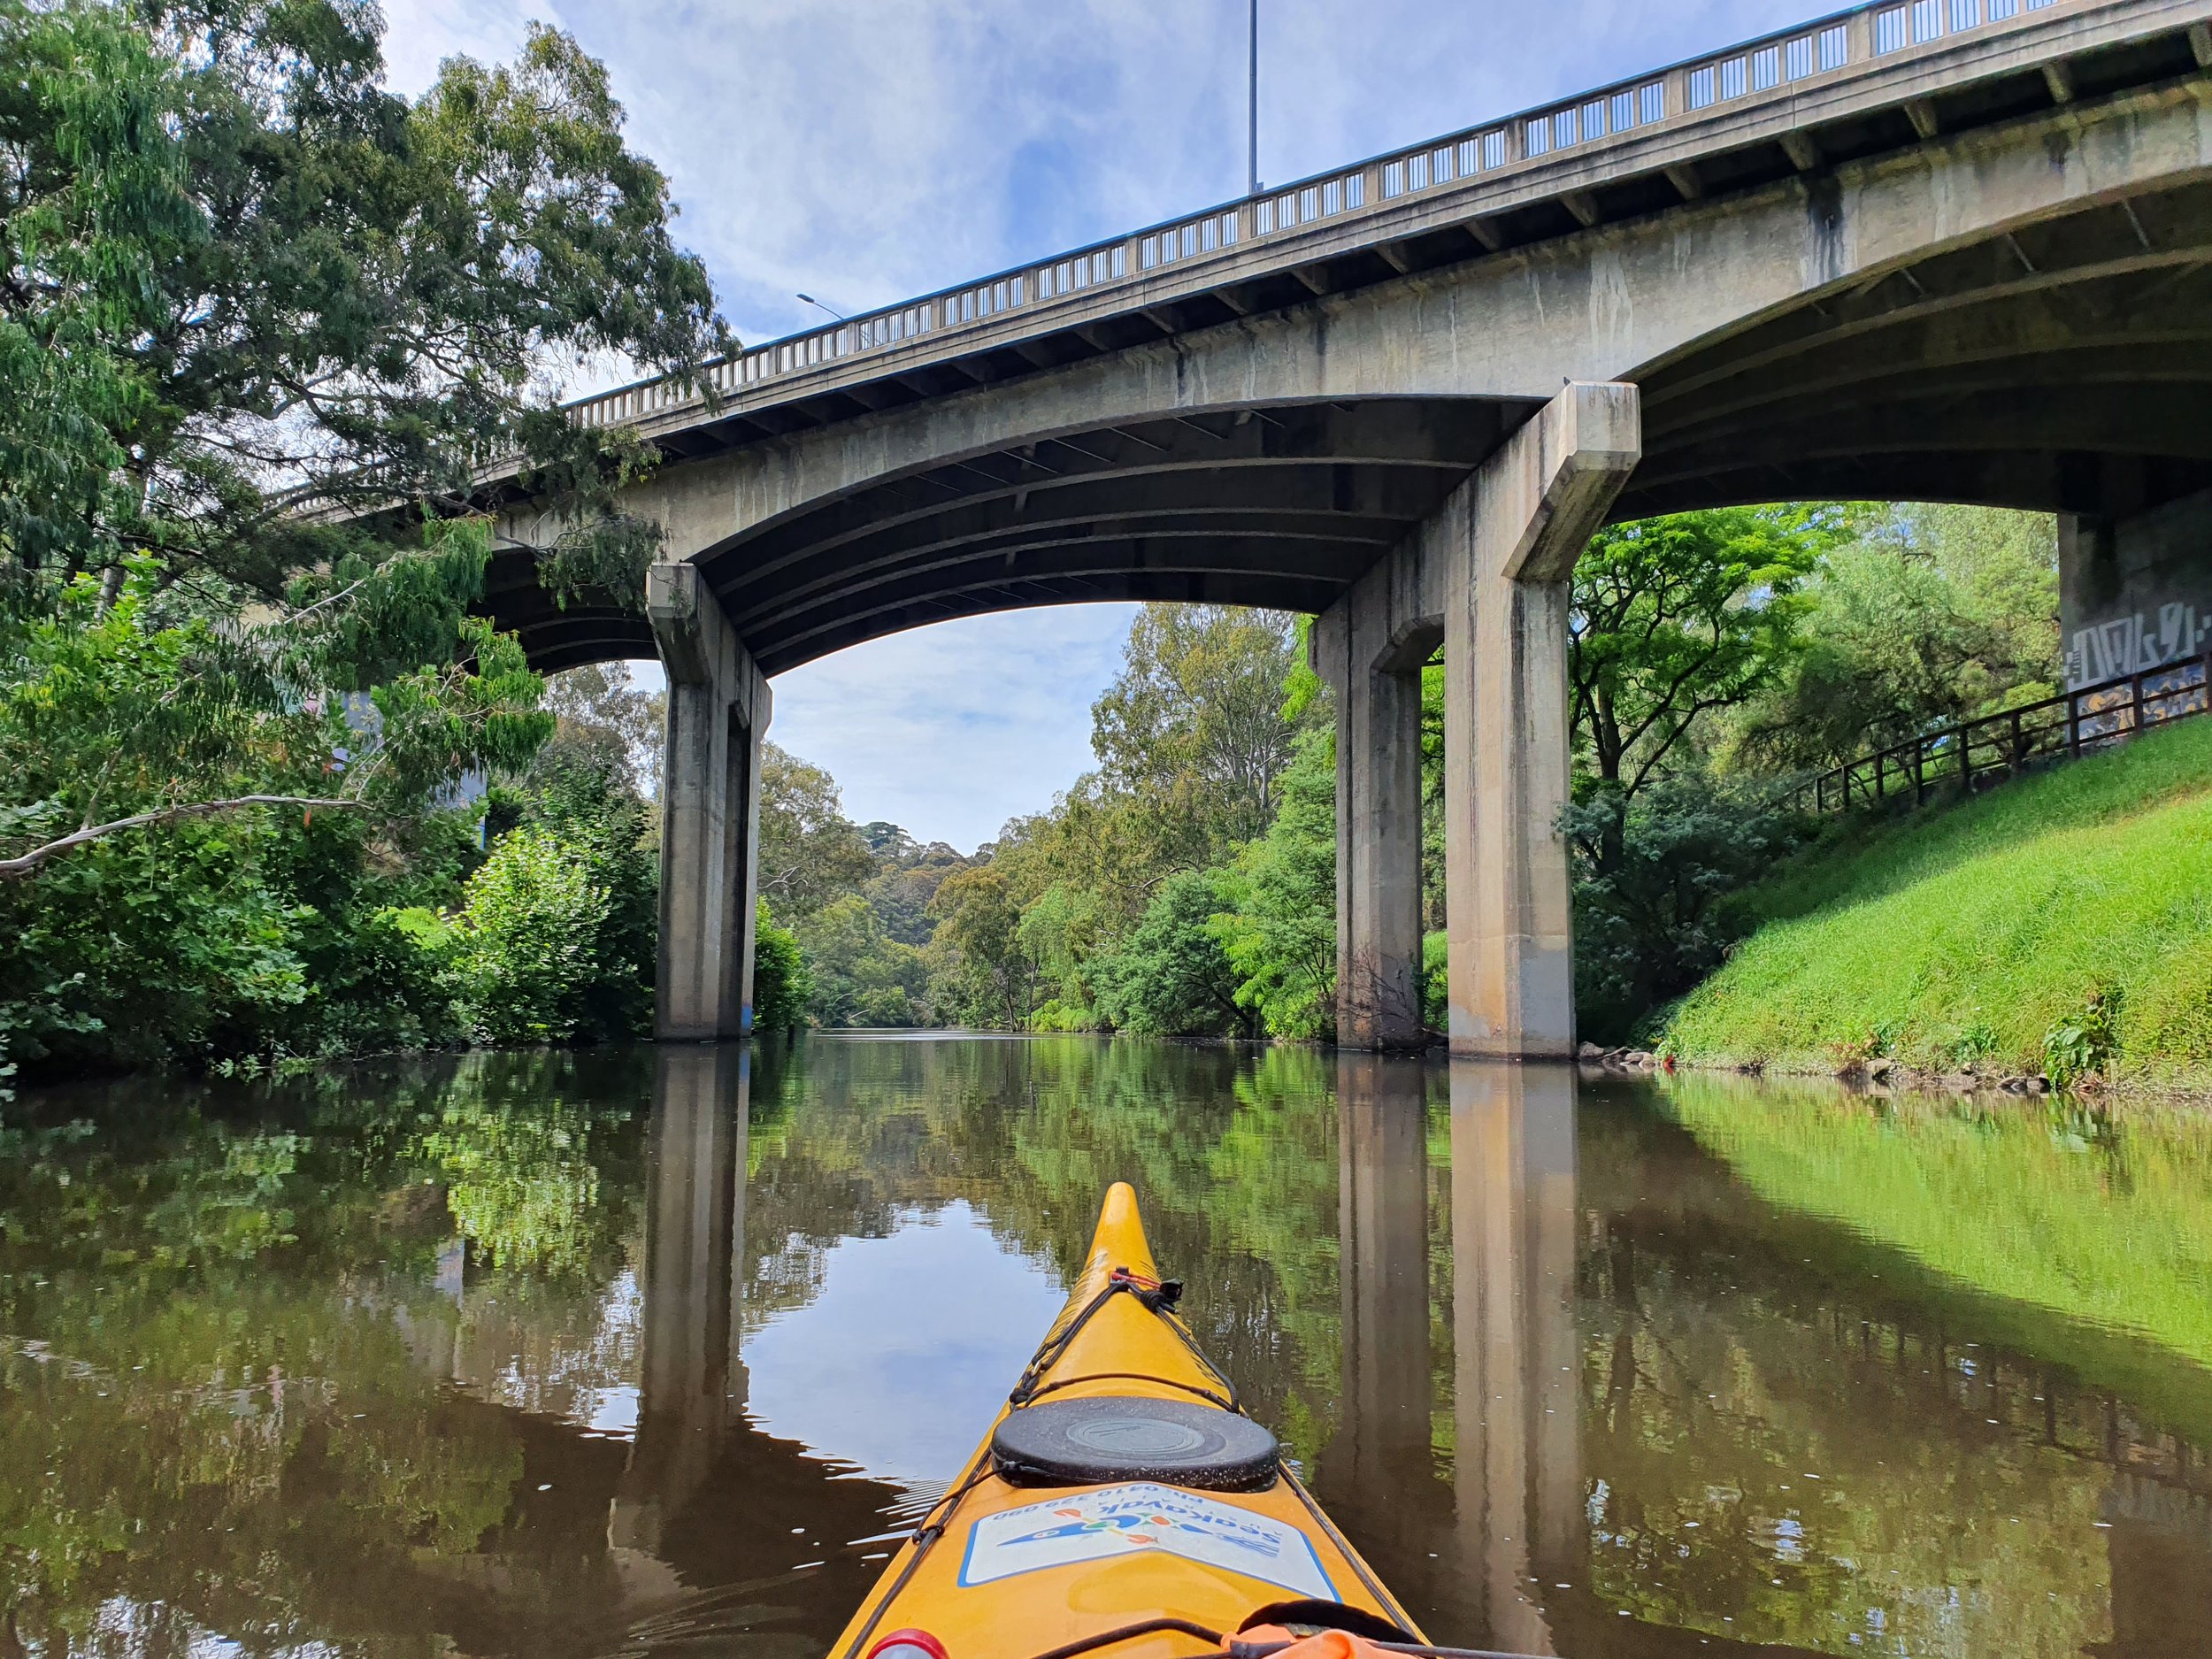
What an amazing way to view Melbourne! Paddle along the Yarra river into Melbourne’s heartland. The bush land comes right down to the water’s edge. A great introduction for interstate or overseas visitors. A special experience for a family, friends, or work colleagues. Relaxing and free to explore at your own pace. Join us on a tour, hire a kayak or bring your own kayak down and explore the Yarra at your own pace.
Spot Water Dragons basking in the sun, listen to the bird life and on occasion spot a platypus or Salvador the resident seal. Pack a picnic lunch and stop at Herring island environmental sculpture park or stop by Kanteen for a coffee before continuing your journey. Boathouse Drive is only a short walk from Flinders Street station in the heart of Melbourne city for a day of exploring the historic Yarra river. Enjoy this paddle past the MCG, Royal Botanic Gardens.
River Rules
Essential equipment
What to wear
River Access
Understanding the water level
Weather
Maps
International maritime law requires you to paddle on the right hand side of channels and rivers. As a kayaker you can paddle on the left if you are seeking Lee, just be aware you are on the wrong side of the channel.
Give way to any craft bigger than you and remember on the Yarra river any craft moving down stream has right of way due to the direction of the river flow.
Always wear a Personal Floatation Device (PFD)
When paddling at dawn, dusk or night time make sure your craft is equiped with a 360 degree white light.
Adhere to all river markers and exclusion zones.
PFD
Pump and bailer
Kayak
Paddle
Spare paddle (incase you lose or break your other paddle)
Dry bag for your valuables (or leave them in the car)
sunscreen
Personal first aid kit
Water bottle
Sturdy close toed shoes (old runners are best)
Quick dry shorts
Fleece (Stays warm when wet)
light rain jacket (great as a wind break)
Sun hat
Sun glasses
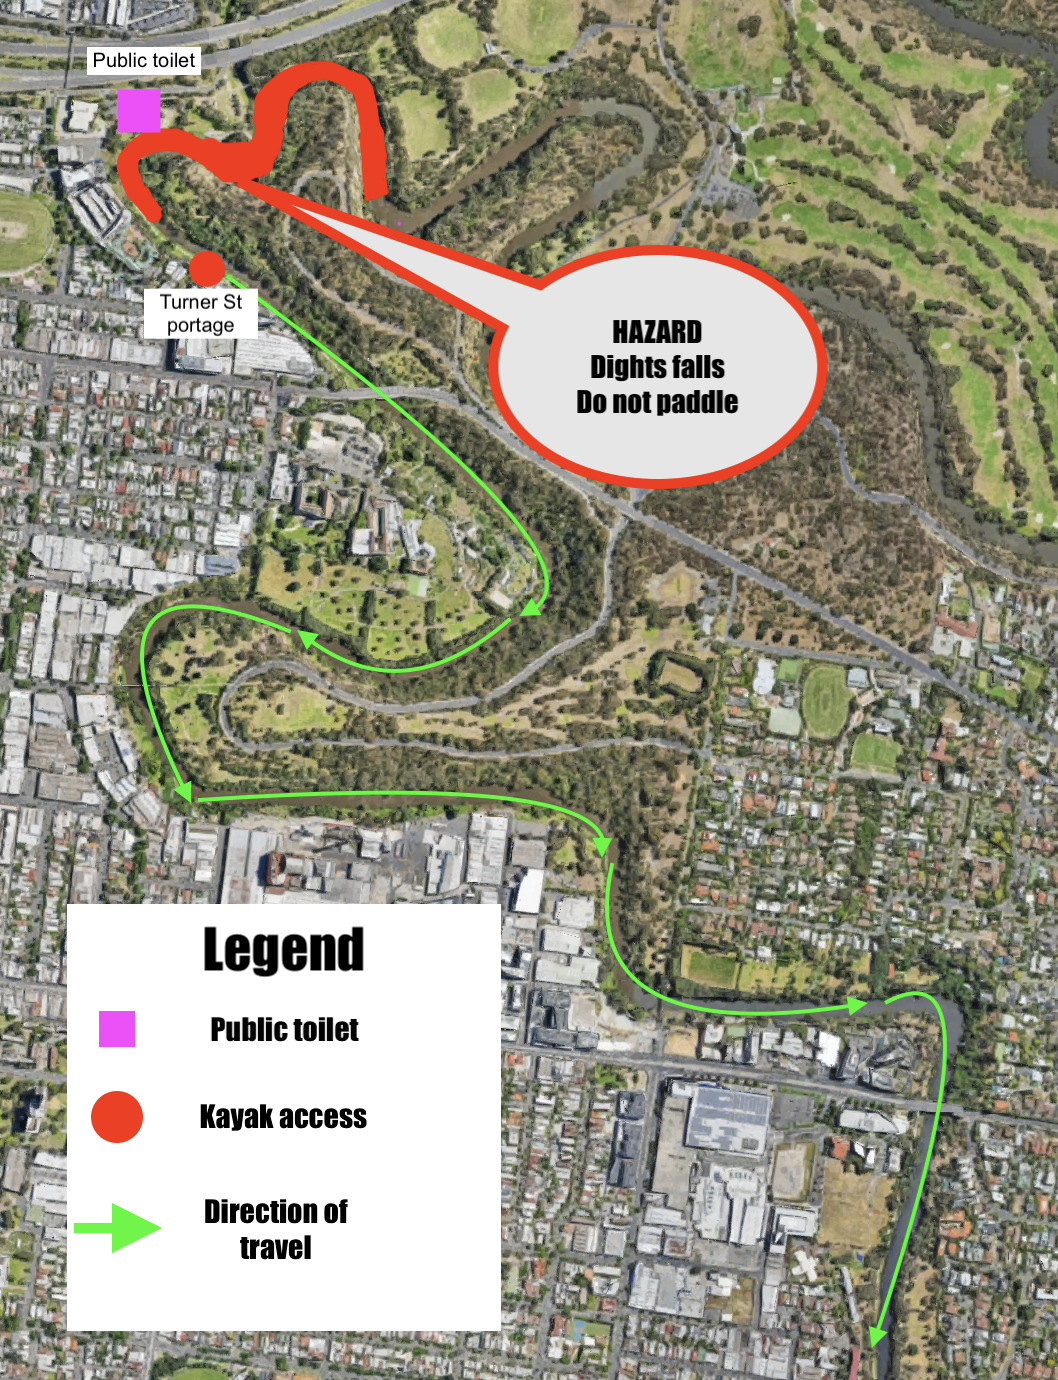
Turner st portage
Turner St Portage put in is just below Dights falls and allows paddlers to access the river without having to navigate the rapids below dights falls. The put in can be accessed via the bike path and there is parking available on Turner St. The river is constricted here and paddling back up stream can be challenging at low tide as small rapids can form under Johnston St Bridge.
Hawthorn rowing club (Currently under construction)
The Hawthorn boat ramp located at the Hawthorn rowing club is a fantastic put in location with lots of parking available, close to public transport, and easy access to the river. The boat ramp is undergoing works to upgrade ramp to a floating platform. work is expected to last a few more months. until such time this location is unavailable.
St. Kevins rowing club
Just under the M1 St. Kevins Rowing club offers great access to the river with some on street parking available. Be aware that the boat ramp is used by rowing teams and so access may be limited depending on the time of day. bring a trolley for your paddle craft as the walk from the road is down a winding path.
Power House Rowing Club
Power house Rowing club has one of the best boat ramps for accessing the river, it is a floating boat ramp allowing great access at different river heights. Parking is limited to on the street parking as the power house car park is restricted to members and tour operators only.
Wesley Rowing Club
Just around the corner from Power House Rowing Club Wesley Rowing Club grants great access right opposite Herring Island. You are able to get your vehicle close to the boat ramp which is perfect for unloading and loading boats but parking is limited to the street.
Boat House drive
Boathouse Drive gives access to the Yarra right in the heart of Melbourne city. A huge boat ramp means plenty of room to work around other users. be aware that the river is much busier here and so you must adhere to the river rules. Parking is limited and paid but public transport is only 200m away at Flinders street station.
Library at the Dock
The library at the dock is a fantastic location to start and end you paddle with great access tot the water via floating boat ramps. parking can be difficult you you will need to carry or use your trolly to get your craft down to the water.
The lower Yarra River is actually an estuary which means it is a mix on both fresh water and salt water from the bay. Dights Falls in Abbotsford prevents the salt water from going further up stream, this does mean that from Dights falls down the water height is affected by the tide.
When paddling the Yarra River it is important to factor in the tidal movement as this can have a significant affect on the strength of the river flow. When there is an out going tide the Yarra river increases in speed as both natural flow of the river and the tide are working together. For novice paddlers this can make it difficult to paddle back up stream.
The best location to take a tide reading for you yarra paddle is richmond
When kayaking the Yarra river it is important to be aware of the river height at the location you are paddling as well as the river height up stream as this flows down stream and can change the river height very quickly.
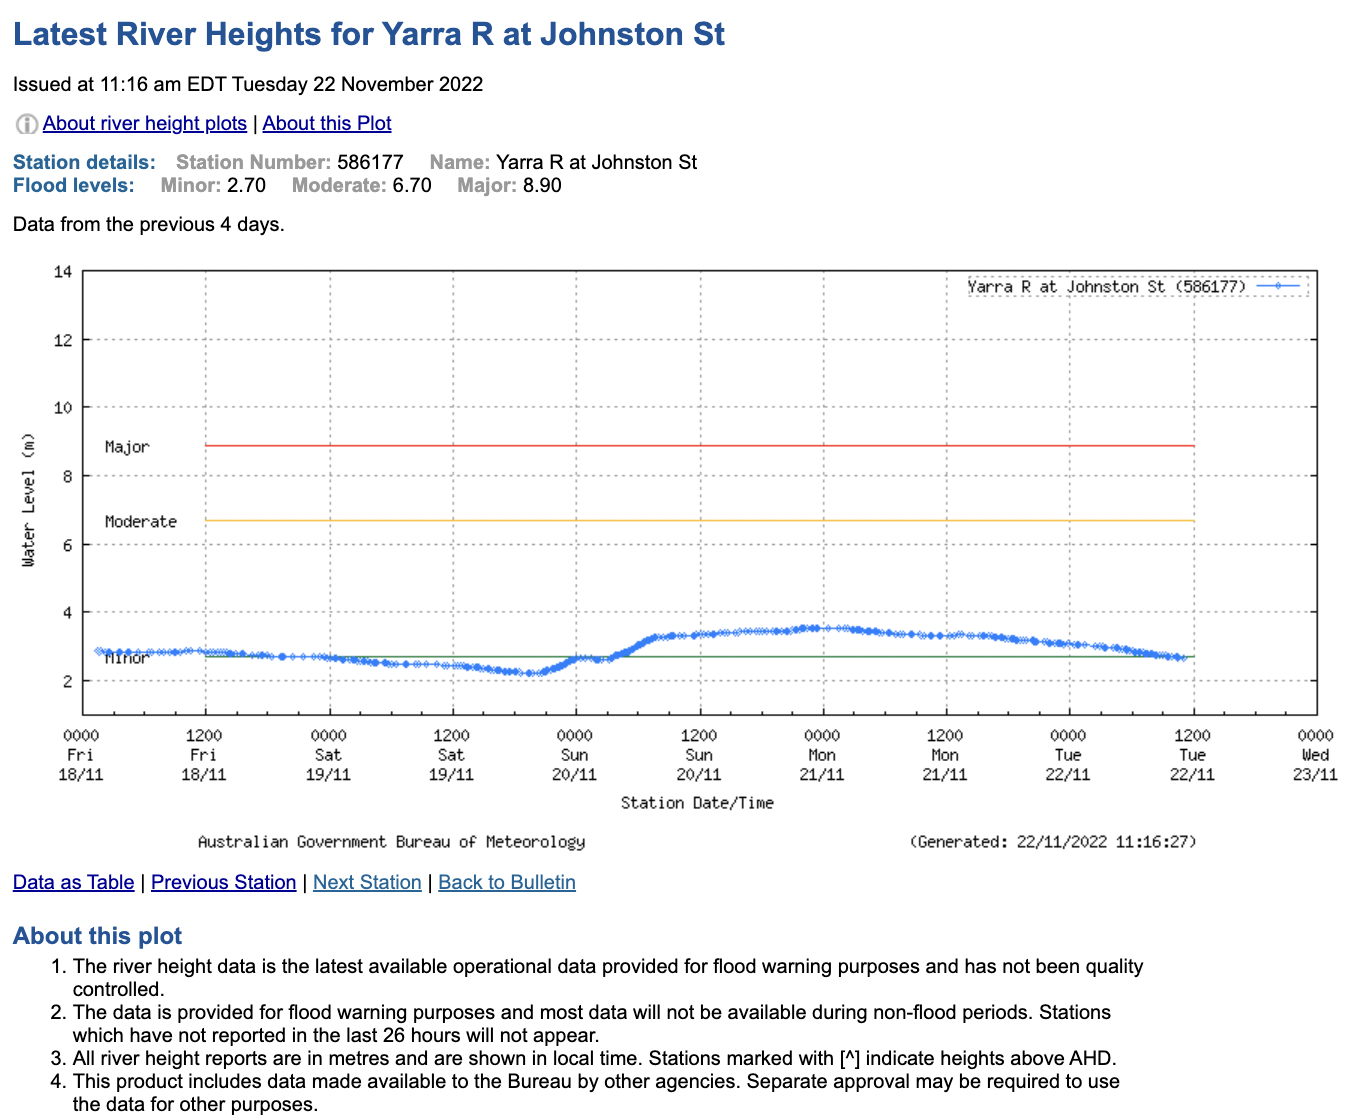
For recreational kayaking we recommend that you only kayak the river when it is below 1.6m measured at Johnston Street Bridge.
The first place you want to go when looking at river heights is the Bureau of Meteorology River Height Bulletin Latest River Heights for the Werribee, Maribyrnong, Yarra, Dandenong, Bunyip this will give you an overview of what is happening in the catchment. For paddling the lower Yarra we have found Johnston Street Bridge to be the best place for current the river height, while checking the height at Fitzimons lane give you a good idea of what is coming down the river.
As with all rivers the height fluctuates depending on a variety of factors, dam releases, rain fall, tide heights etc. When the water level rises the river changes and can very quickly become a dangerous environment for example during 2022 Victorian floods the river reached a height of 7m at Johnston street Bridge.
When there is more water in the river; there is increased flow (speed of the river), rapids can form, access to the river can be limited, hazardous debris can be floating down the river and, there can be unseen obstacles just to mention a few examples.
Why do we suggest to only paddle the river below 1.6m (measured at Johnston Street Bridge)?
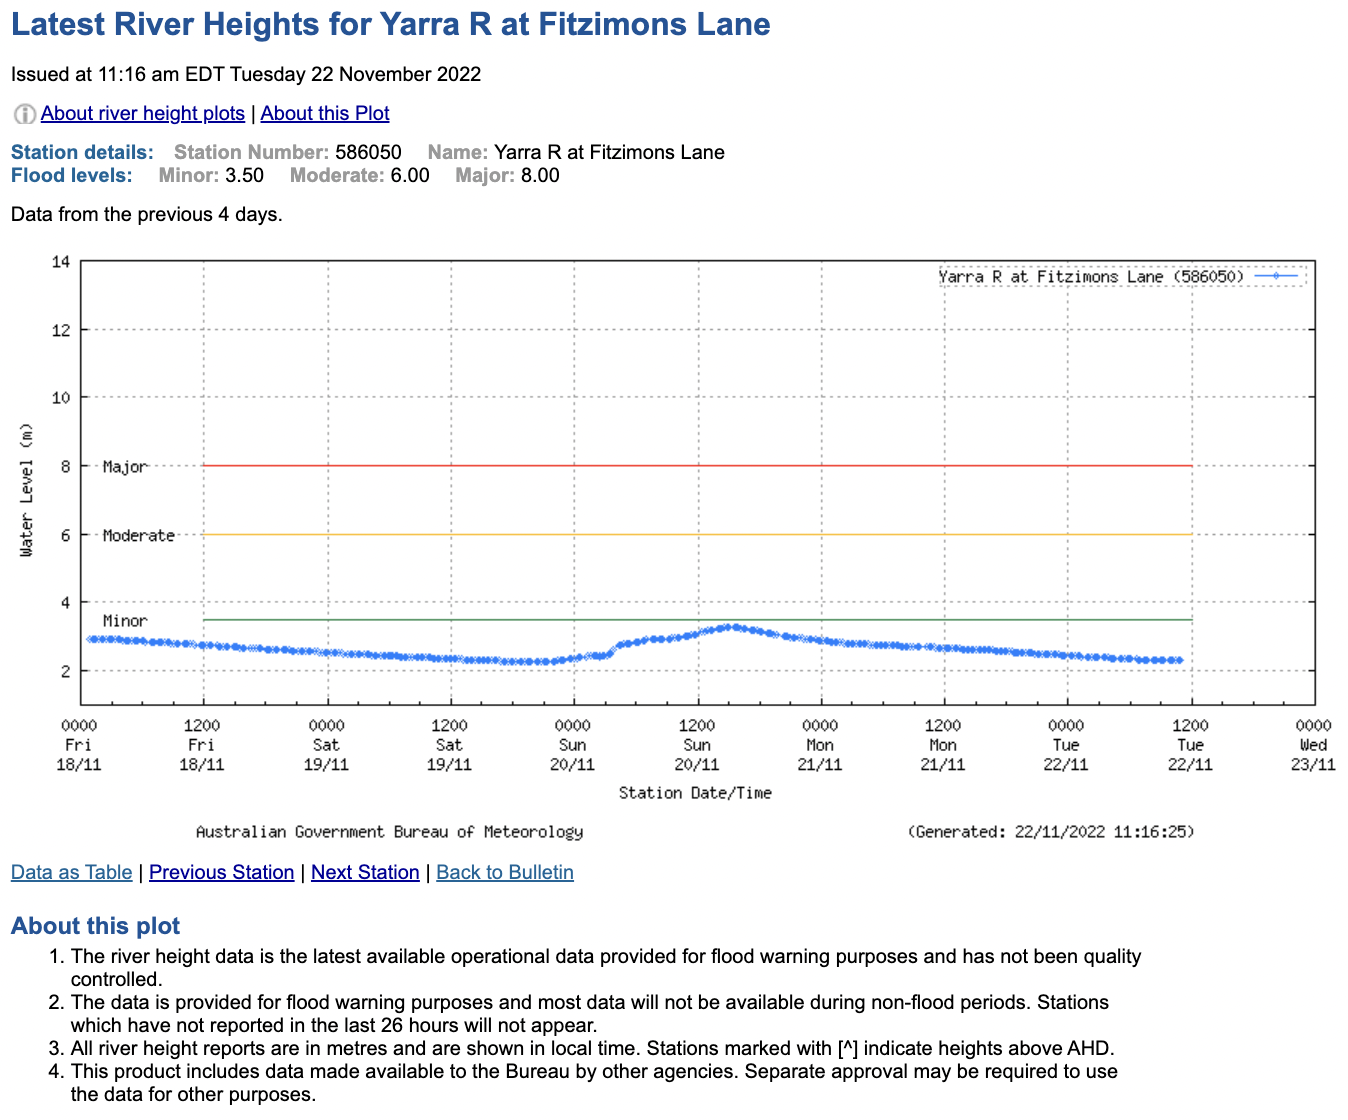
Looking at the River Height plot’s below we can see that on the 22nd of November 2022 the river was no longer in “Minor flood”, but this doesn’t mean that the water level is safe for kayaking.
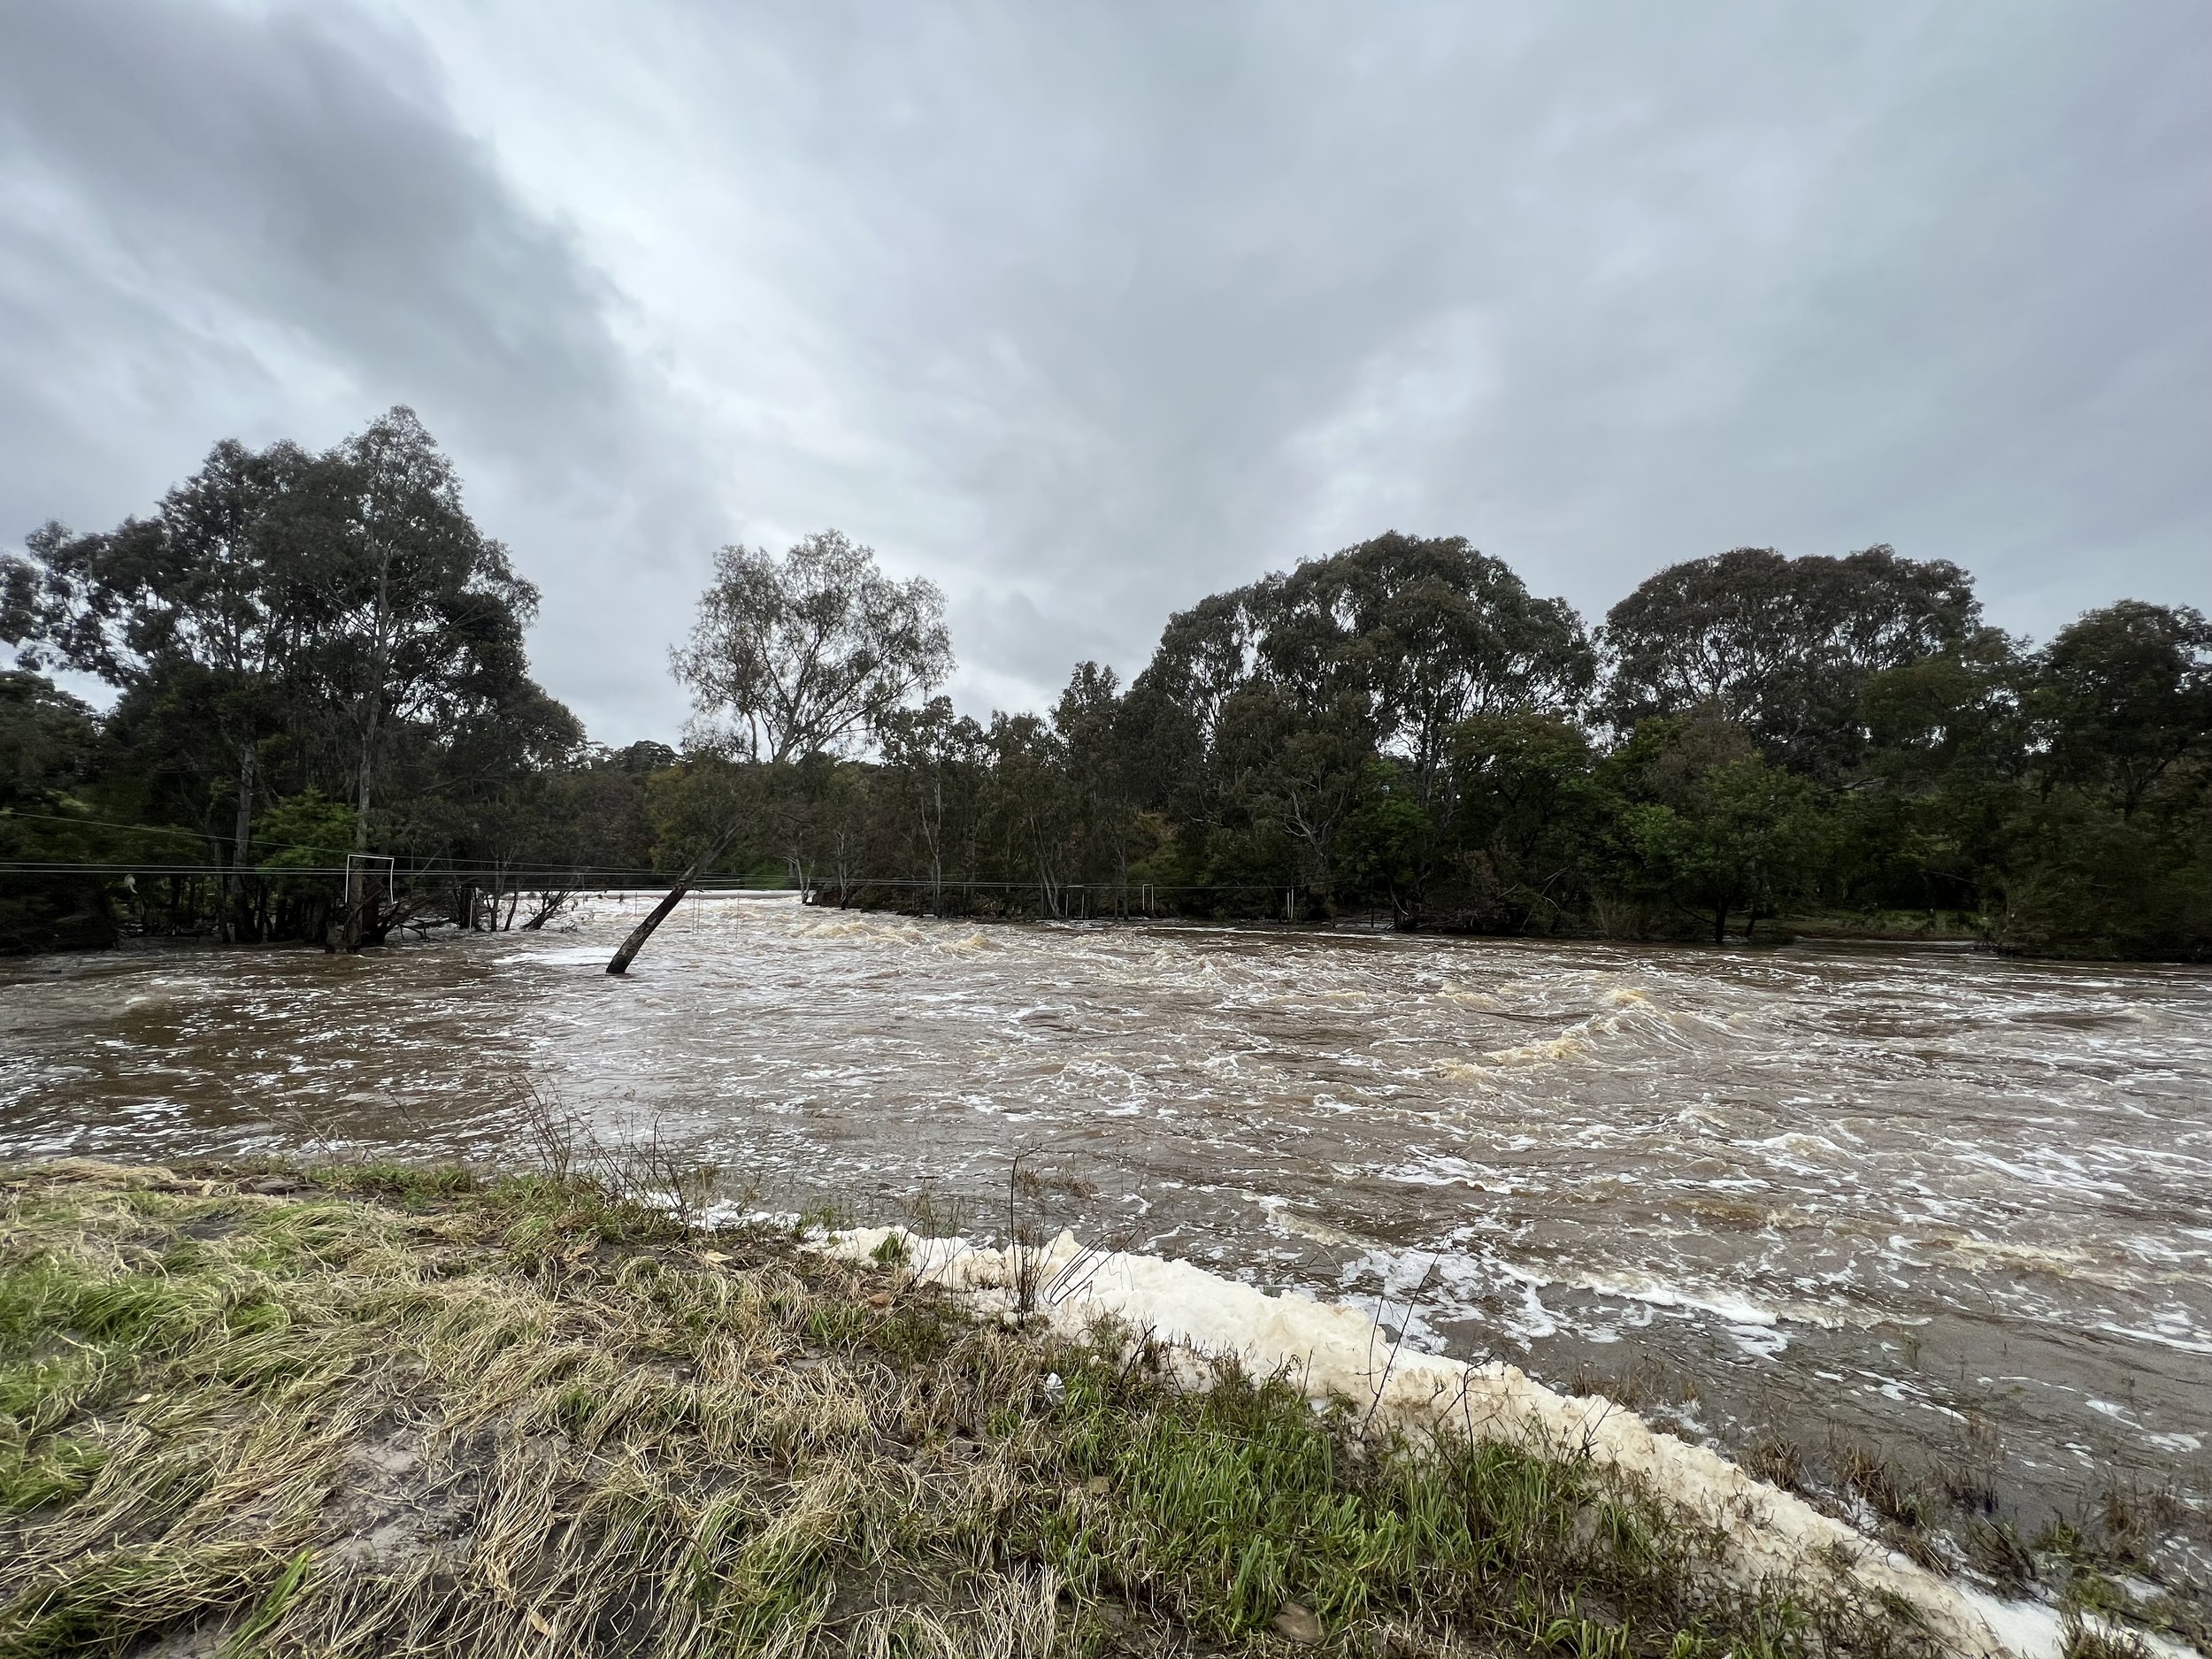
The Yarra river height at Fitzimons Lane is sitting at just over 2m and well below minor flood while the river height at Johnston Street Bridge is sitting just below minor flood at 2.6m. However the river was not safe for recreational kayaking below are some pictures of the river taken on the 22nd of November 2022.
As you can see there is increased flow in the river resulting in white water, footpaths underwater, debris building up on obstacles such as bridges and trees, boat ramps are completely underwater making accessing the river difficult. Paddling the river in conditions like this is dangerous so always make sure you are checking the river height and make informed decisons.
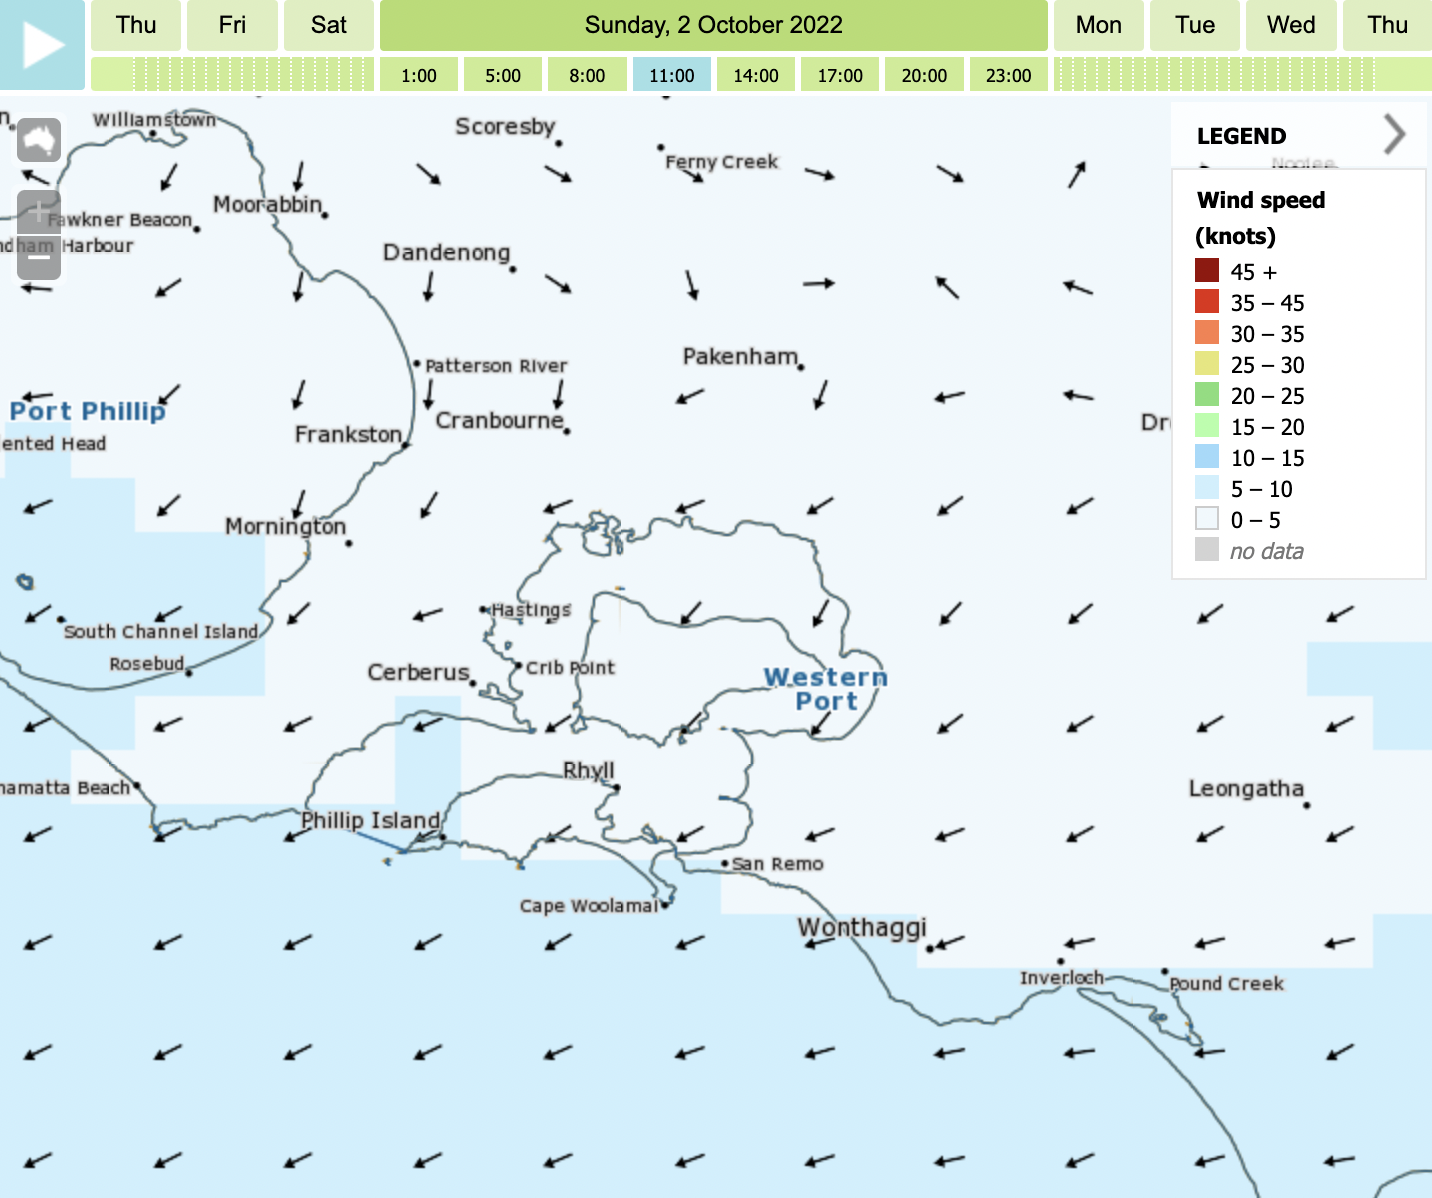
Kayaking is all about understanding the weather and making good judgment calls about when to paddle and more importantly, when not to paddle.
The wind is key as it plays the biggest part in deciding whether its a great day for paddling or not. When assessing wind speed we use the measurement knots, as a general rule look to avoid paddling in winds blowing speeds of 15 knots or more ,until you have achieved your basics skills certificate in Sea Kayaking.
To interpret the wind forecast you need to understand Fetch and Lee. Watch this video on Fetch and Lee.
Below you will find a list of resources we use to monitor and interpret the weather for our tours, expeditions, courses and hire.
Port Phillip Local Waters Forecast
A great first stop to see what the weather forecast out on the bay is.
http://www.bom.gov.au/vic/forecasts/portphillip.shtml
MetEye Port Phillip and Western Port
MetEye is a fantastic tool and a kayakers best friends for predicting wind.
http://www.bom.gov.au/australia/meteye/?loc=VIC_MW005
256Km Melbourne Radar Loop
The best resource to monitor local rain fall.
http://www.bom.gov.au/products/IDR022.loop.shtml
Willy Weather tides
Willy Weather uses a great graphic to show the tide and relevant height.
https://tides.willyweather.com.au/vic/melbourne/sandringham.html
Bay Winds X
For live updates of wind speeds on the bay.
http://baywx.com.au/
Bay Winds X Fawkner Beacon
Fawkner Beacon measures winds speeds in the Northern half of the bay and is the most relevant measurement location for paddling out of Sandringham.
http://www.baywx.com.au/fbeacon.html
EPA
For all water quality updates.
https://www.epa.vic.gov.au/for-community/summer-water-quality


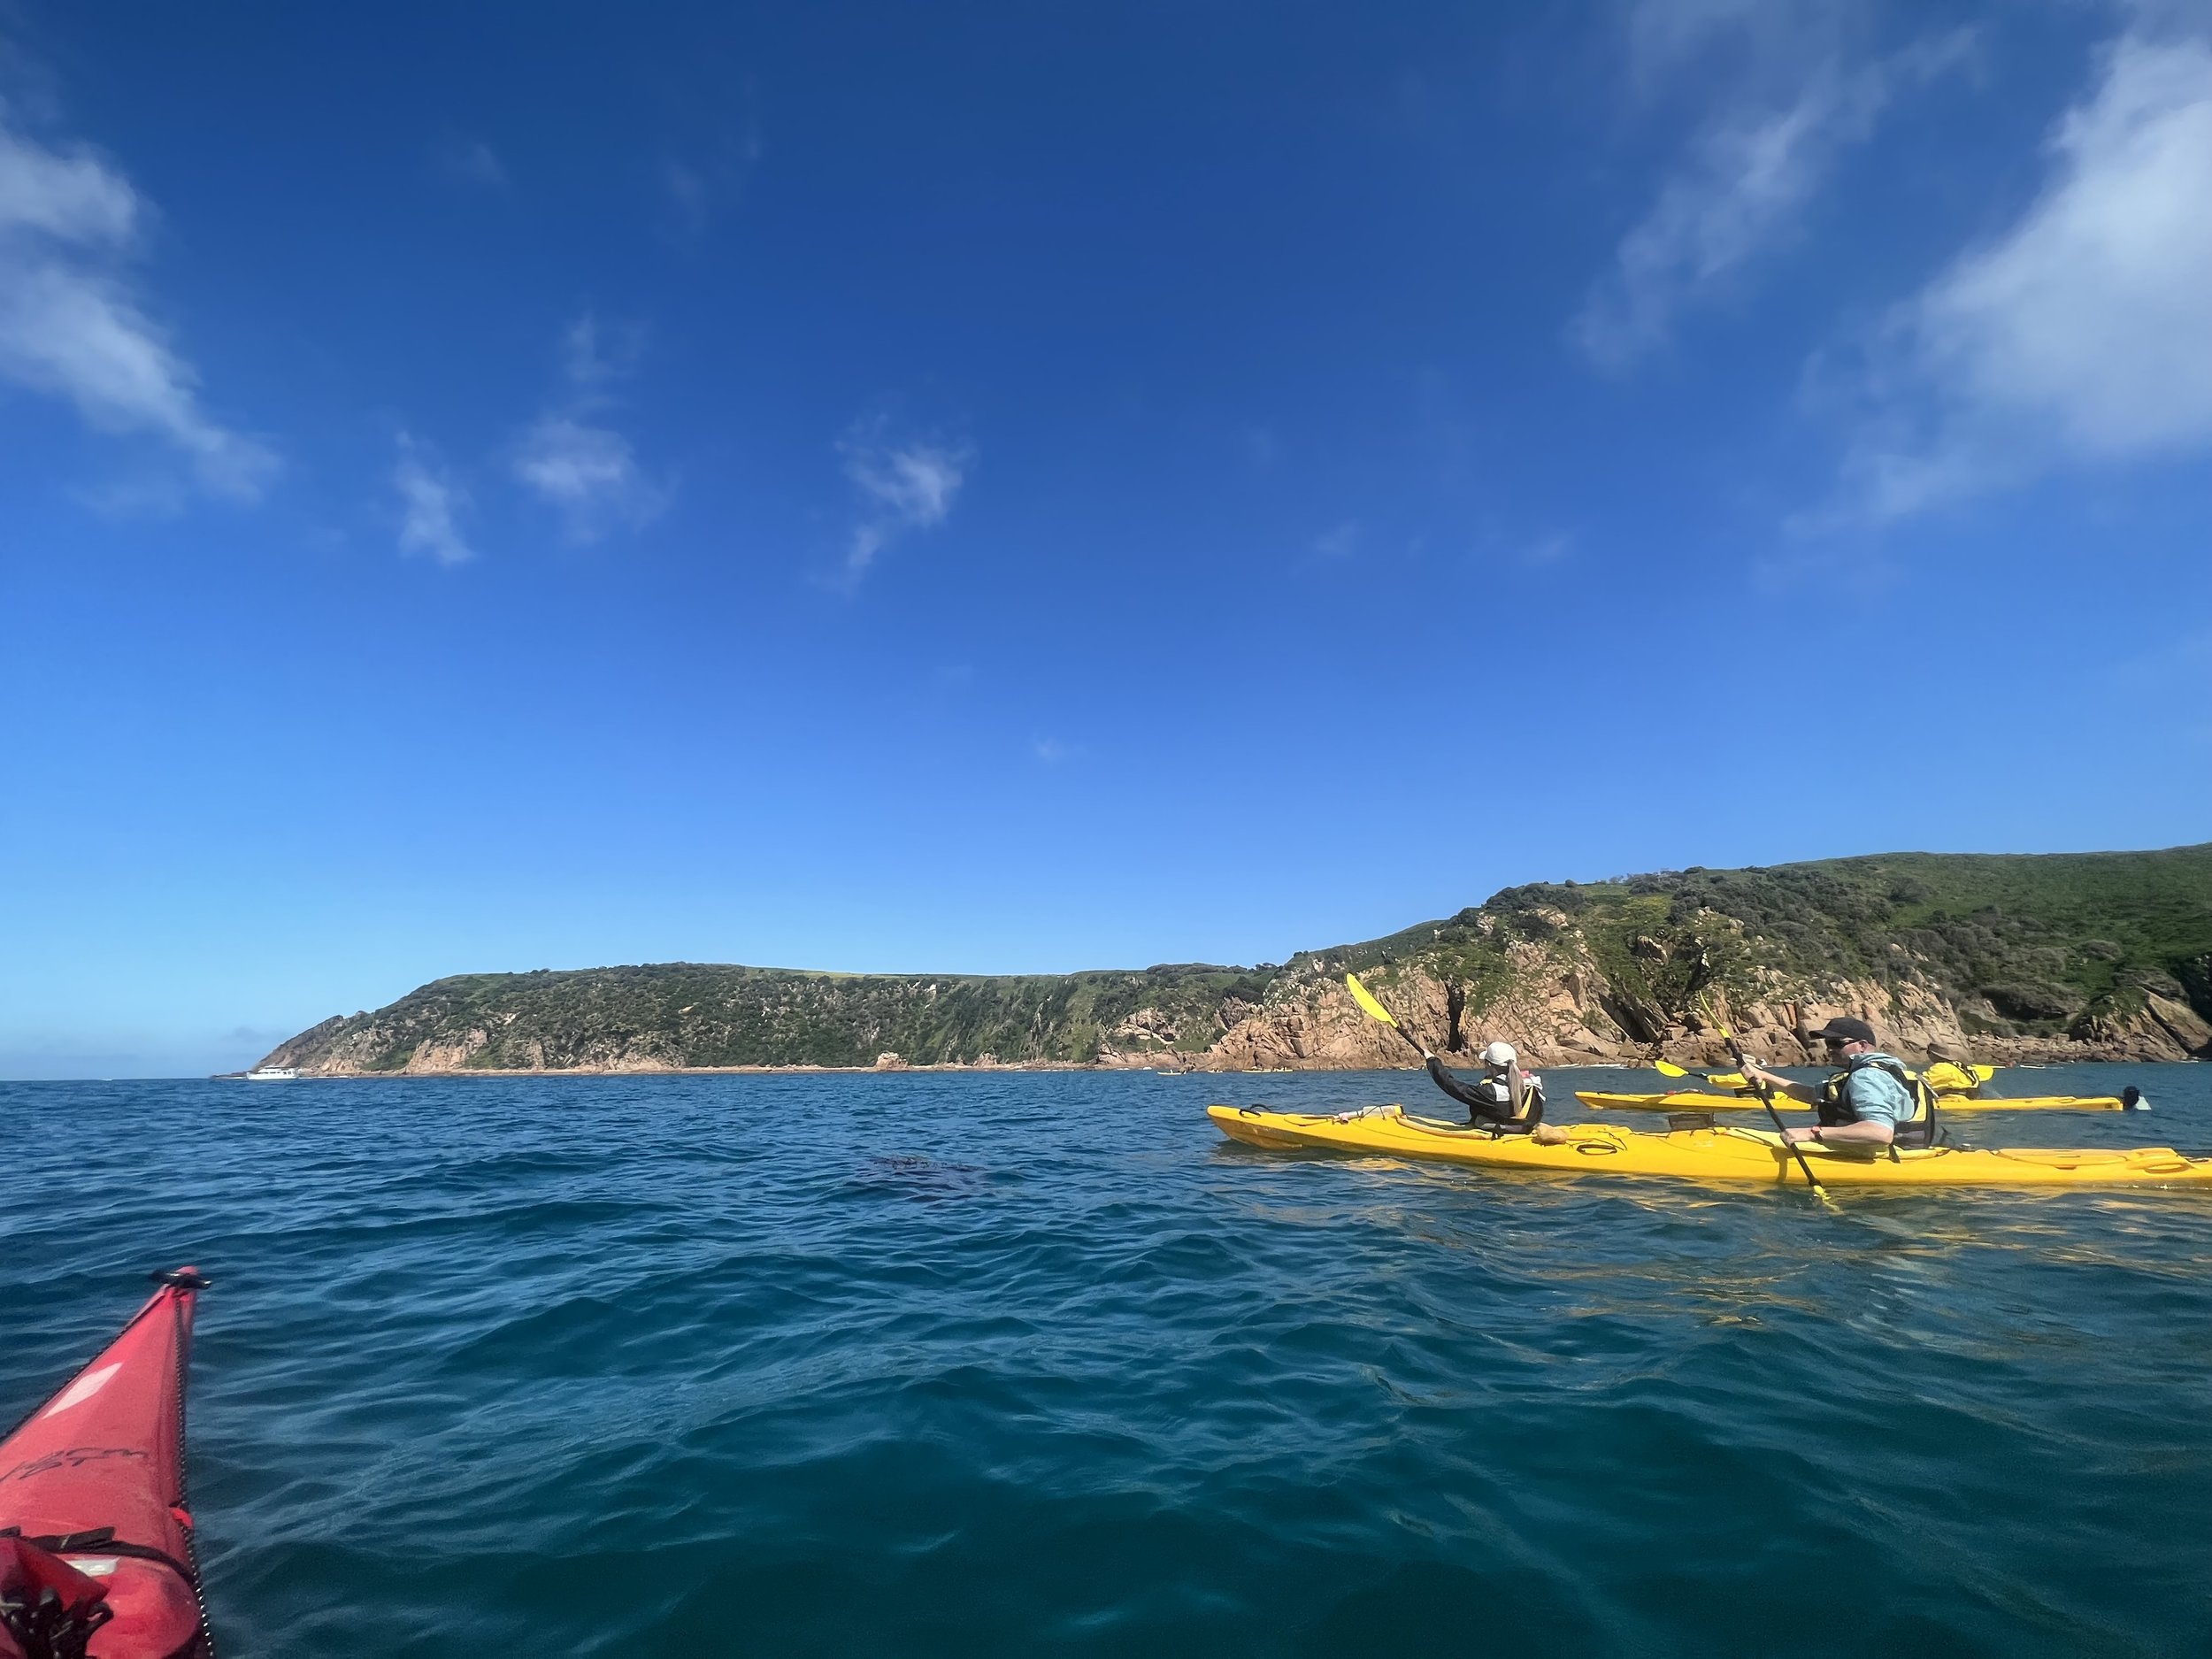
Point Nepean offers beautiful paddling along a gorgeous coastline dotted with mansions, magnificent cliffs, and stunning beaches. Paddle through the dolphin sanctuary where you may have the opportunity to see dolphins up close then stop for lunch at the quarantine station before beginning your return journey. With the right wind and tide combo this is one of the best sea kayaking locations within Port Phillip bay.
When planning this paddle there are a few important factors you need to consider.
The Rip (constriction), is the name given to the tidal stream that flows between Point Nepean and Point Lonsdale. This tidal stream can reach speeds of up to 8kts (16kmh). Plan to paddle this area at slack tide measured at the rip. The most common mistake kayakers make while paddling around the constricted area called “The Rip” is to follow 50/90/max rule, this area is the exception to the rule and can have deadly consequences. This is because slack tide at “The Rip” is delayed from low tide at Portsea/Queenscliff due to its massive constriction.
This location can be exposed to enormous fetch from the North & North East, smaller fetch but still significant from the East & West, while the coastline offers lee from winds blowing from the South.
Protruding land masses, several points along the coastline can cause eddies which are amplified by the presence of “The Rip”.

Constriction
A constriction is when the tide becomes “constricted” when the environment becomes narrow or shallow causing the tidal stream to increase in speed. Port Phillip Heads is a good example of a current speed increase when the water flow is constricted. The highest current speeds experienced in Victoria are a maximum of 8 knots (16Kmph) at Lakes Entrance and Port Phillip Heads.

Protruding landmass/Eddies
When a headland or promontory juts out into a tidal current, current speed will increase generally towards the most exposed part of the land. Creating a low pressure system or “eddy”.
When planning for a Point Nepean paddle the first consideration must be the tide. Remember you are dealing with constriction so you want to be paddling at this location as close to slack tide (measured at “The Rip”) as you can. Ideally slack tide would be at 12pm followed by a flooding tide. This ensures you have assistance on your return journey and you don't get sucked out into bass strait. Below is a list of the resources we use when planning a tour. Remember tides are the rise and fall of sea levels caused by the combined effects of gravitational forces exerted by the Moon, Sun, and rotation of the Earth. Therefore you can find tidal predictions for years in advance.

Understanding “The Rip”
“The Rip” is the entrance to Port Phillip flowing between Point Lonsdale and Point Nepean (known as “the heads”) it is one of three monitored tidal streams in Australia. The heads are 3.5km wide but with reefs protruding from both points the navigational channel is reduced to about 1km in width. Due to this constriction and such a large amount of water needing to travel through the heads you must always aim to paddle around this location at slack tide.
When planning you paddle it is integral you check the tides at “The Rip” and aim to paddle at the indicated slack tide.

Alternatively you can print out the relevant tidal chart PDF here: http://www.bom.gov.au/ntc/IDO59002/IDO59002_2022_VIC_TS001.pdf

Fetch & Lee
As we have already covered, this location can be exposed to enormous fetch from the North & North East, smaller fetch but still significant fetch from the East & West, while the coastline offers lee from winds blowing from the South.
Unlike the tide winds can’t be forecast years in advance. That being said, there are some fantastic tools you can use to monitor the forecast wind and make good judgement calls. Here are the resources we use to monitor wind conditions and forecasts for this particular location
MetEye, forecast map for Port Phillip bay and Western Port: http://www.bom.gov.au/australia/meteye/?loc=VIC_MW005


edit to make north and south. check south channel for south bay and fawkner for north bay
http://www.bom.gov.au/vic/forecasts/map.shtml
http://www.bom.gov.au/vic/forecasts/portphillip.shtml
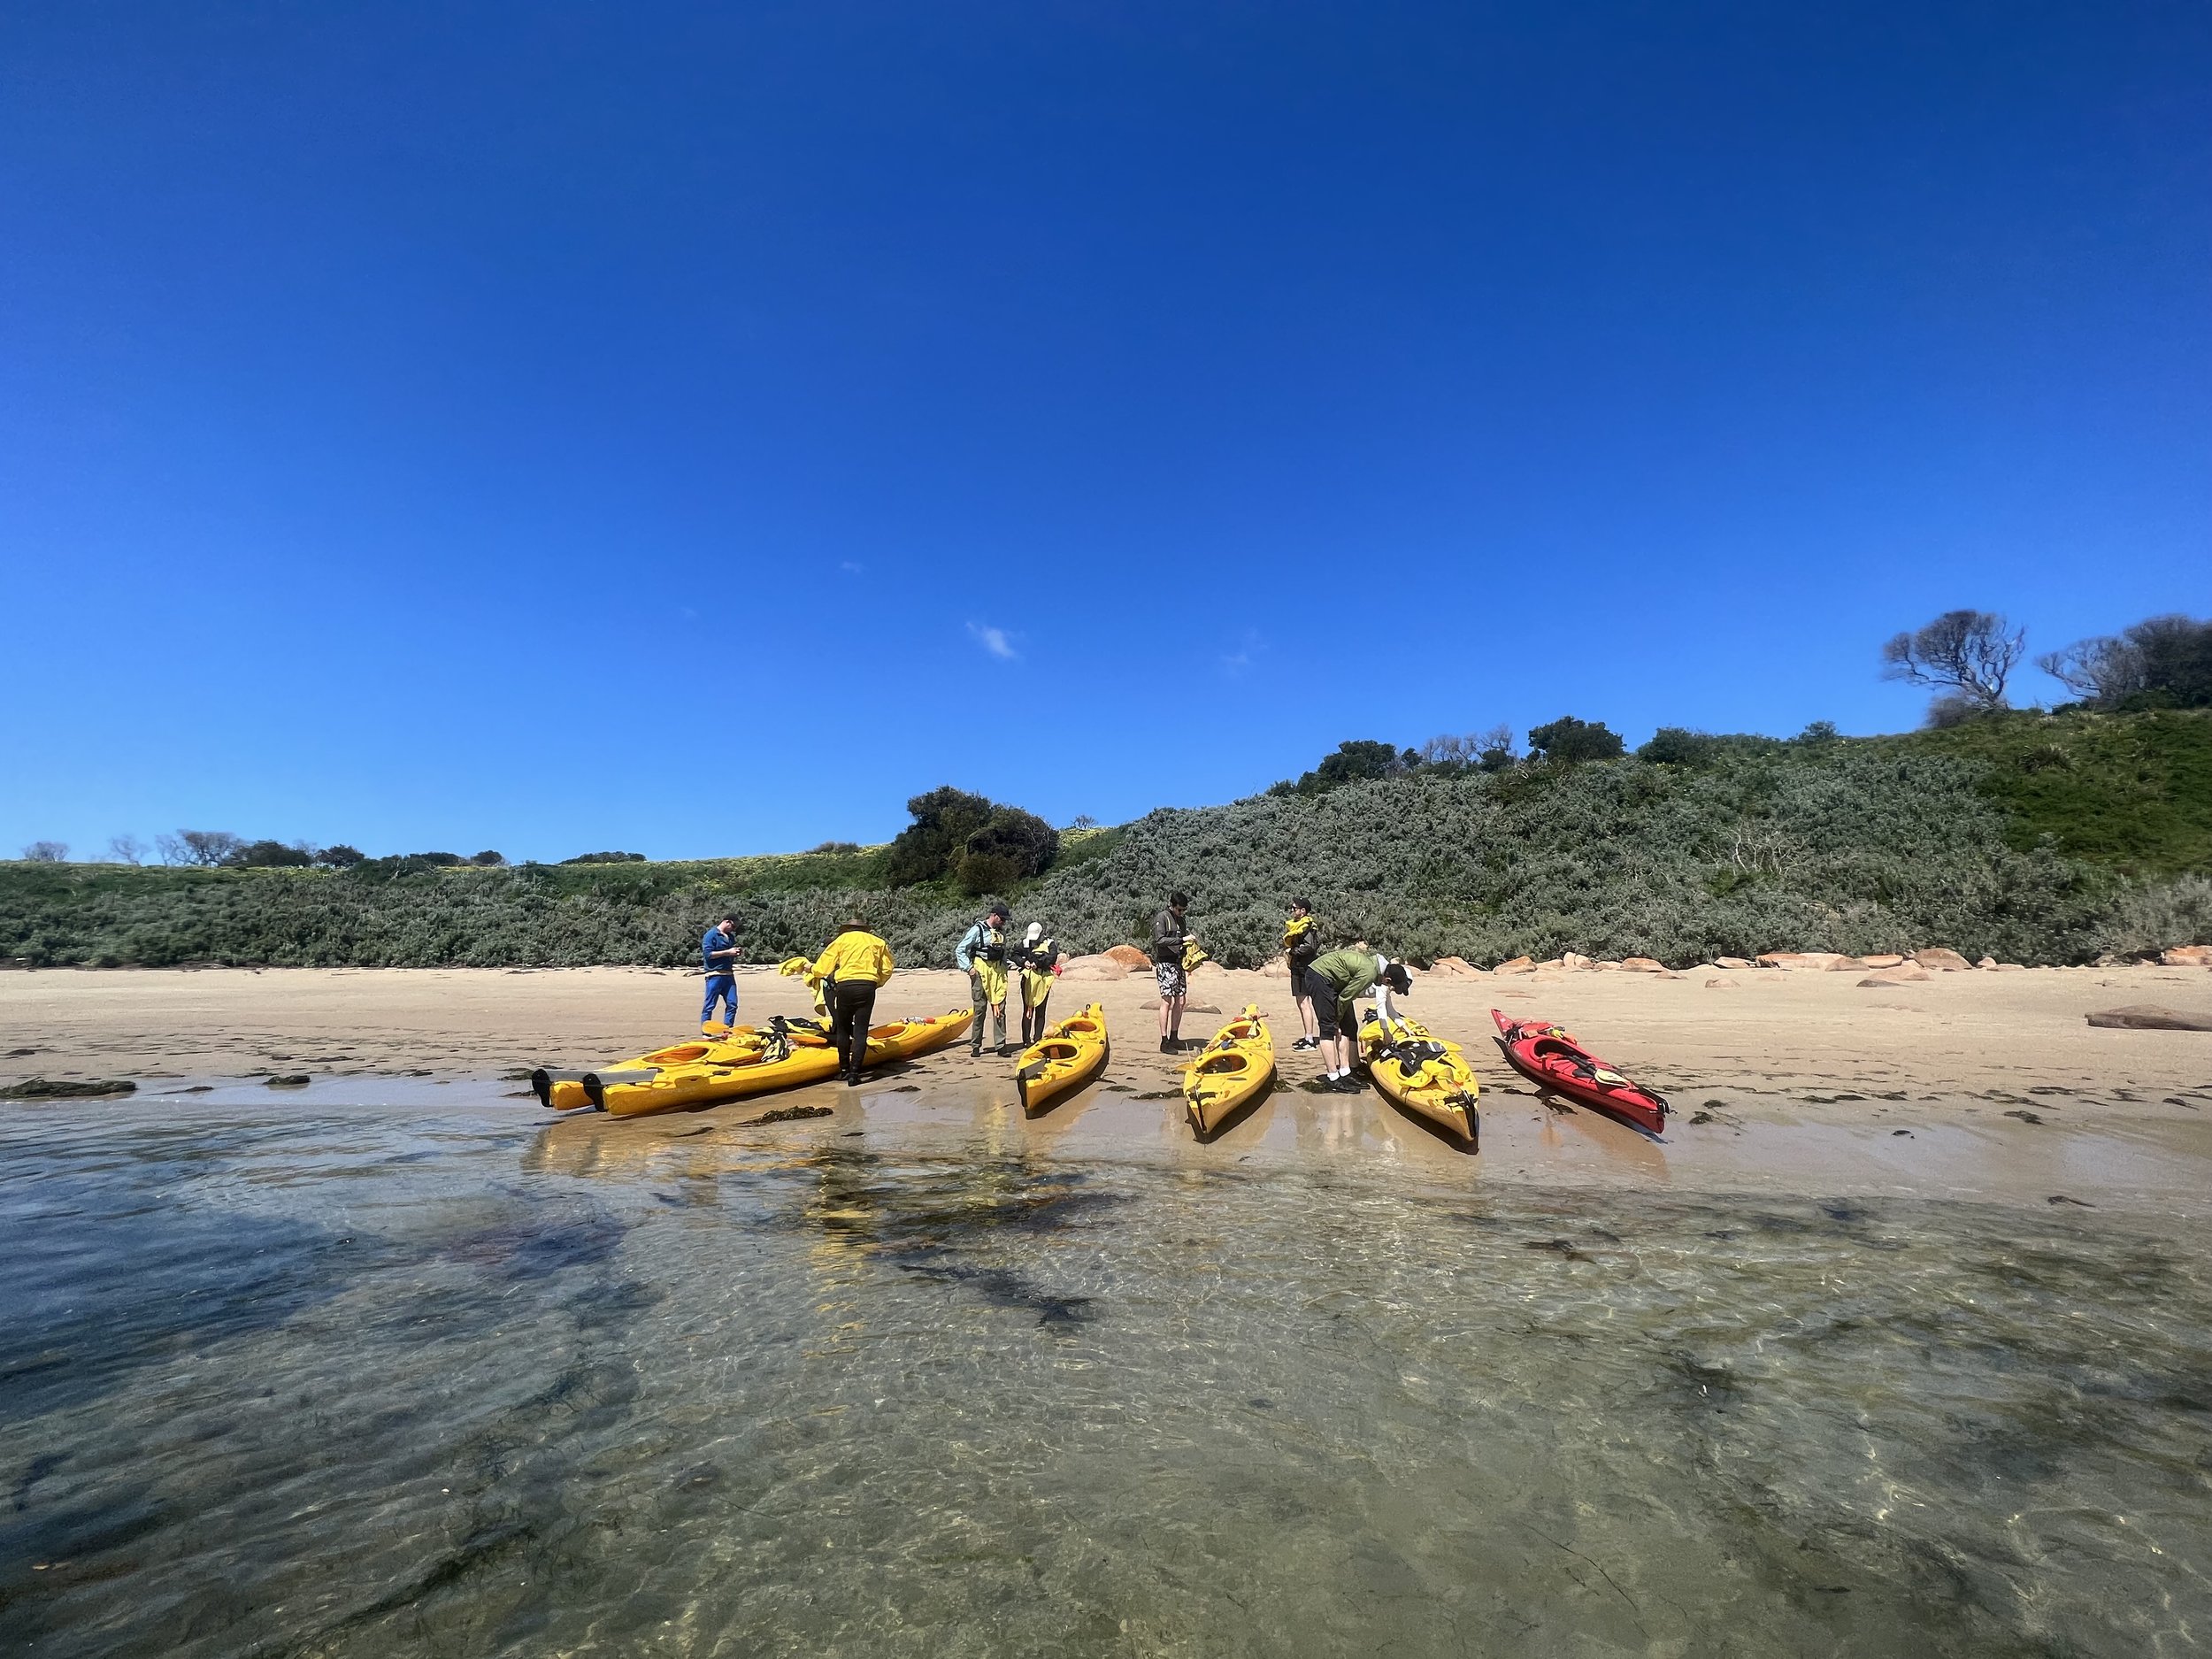
The best place to start your paddle is either Sorrento (parking at Sorrento beach Carpark) or Portsea (access via the Cutting).

Beginning at Sorrento you paddle along the coastline keeping the cliffs on your left, enjoy stunning views out across the bay, watch cargo ships as they pass you by in the shipping lanes (make sure you do not paddle in the shipping lanes). Keep your eyes peeled for the first sign of Dolphins if they are around they will often come and check you out, although if there is heavy boat traffic they tend to stay away.
As you journey along the coast you will come across Portsea identifiable by the iconic portsea pub nestled above Portsea beach. This is where you journey begins if you choose to start at Portsea. Paddle past the pier continuing down the coast towards the quarantine station. As you paddle along keep an eye on the cliffs for the remains of old limestone kilns used to create cement for building early melbourne
Finally you have arrived at the quarantine station and you are met by one of victoria's best most stunning beaches. Stop here for lunch and explore the historical quarantine station dating back to 1852 or relax on the beach.
After lunch it is time to jump back in your kayak and begin the return journey. If you have planned it correctly you will have the tide assisting you. A lucky few groups will get the dolphins both on the way down and the way back.

Welcome to Sandringham Harbour home of The Kayak Shop Australia, the best location to start and finish a day of kayaking in Port Phillip Bay. Why is it the best? Because the Harbour provides a safe location to launch and land in Lee, sheltered from all directions and can be paddled in most conditions. Sandringham is a great place to join us for a day of training, hire a kayak or bring down your own kayak and set off on your own journey.
There are several important steps that need to be taken when planning for a day of kayaking;
Choosing the right conditions (Interpreting the weather)
Choosing a route
Key safety points
Kayaking is all about understanding the weather and making good judgment calls about when to paddle and more importantly, when not to paddle.
The wind is key as it plays the biggest part in deciding whether its a great day for paddling or not. When assessing wind speed we use the measurement knots, as a general rule look to avoid paddling in winds blowing speeds of 15 knots or more ,until you have achieved your basics skills certificate in Sea Kayaking.
To interpret the wind forecast you need to understand Fetch and Lee. Watch this video on Fetch and Lee.
Below you will find a list of resources we use to monitor and interpret the weather for our tours, expeditions, courses and hire.
Port Phillip Local Waters Forecast
A great first stop to see what the weather forecast out on the bay is.
http://www.bom.gov.au/vic/forecasts/portphillip.shtml
MetEye Port Phillip and Western Port
MetEye is a fantastic tool and a kayakers best friends for predicting wind.
http://www.bom.gov.au/australia/meteye/?loc=VIC_MW005
256Km Melbourne Radar Loop
The best resource to monitor local rain fall.
http://www.bom.gov.au/products/IDR022.loop.shtml
Willy Weather tides
Willy Weather uses a great graphic to show the tide and relevant height.
https://tides.willyweather.com.au/vic/melbourne/sandringham.html
Bay Winds X
For live updates of wind speeds on the bay.
http://baywx.com.au/
Bay Winds X Fawkner Beacon
Fawkner Beacon measures winds speeds in the Northern half of the bay and is the most relevant measurement location for paddling out of Sandringham.
http://www.baywx.com.au/fbeacon.html
EPA
For all water quality updates.
https://www.epa.vic.gov.au/for-community/summer-water-quality
Once you have found a day with good conditions the next step is choosing a route that works with the wind on your chosen day. See the maps below for our suggested routes.

Northern Routes
Green Point
Ideal winds for this paddle are N, NNW & NW.
Lee is offered from the East and South (Remember to always launch and land in lee).
5km return trip.
Brighton Baths
Ideal winds for this paddle are N, NNW & NW.
Lee is offered from the East and South (Remember to always launch and land in lee).
9km return trip.

Southern Routes
Red Bluff
Ideal winds for this paddle are S, SE & E.
Lee is offered from the East and South East (Remember to always launch and land in lee).
8km return trip.
Half Moon Bay
Ideal winds for this paddle are S, SE & E.
Lee is offered from the East and South East (Remember to always launch and land in lee).
9km return trip.
Black Rock
Ideal winds for this paddle are E & SE.?
Lee is offered from the East and South East (Remember to always launch and land in lee).
13km return trip.
Ricketts Point
Ideal winds for this paddle are E & SE.?
Lee is offered from the East and South East (Remember to always launch and land in lee).
16km return trip.
Fit your PFD, Loosen the straps, put the PFD on and clip/zip up the front beginning with the belly button clip (which everyone forgets), now fasten the sides and shoulders of the PFD to ensure a comfortable and safe fit.
Valuables - are best left in your vehicle or in The Kayak Shop - Carry at your own risk
Wind - know when the wind is it increasing speed, decreasing speed and changing directions. Best practice is to paddling into the wind and come back with the wind
Be aware of and give way to other water users
Paddle on the right hand side of a channel and cross on a right angle.
If it goes horribly wrong head to the nearest beach drag the kayak up to the dry sand walk of shame we won’t be impressed.
Controlling your craft
How to hold your paddle, hold the paddle out front look ensure the smiley face is facing you on the right hand side, place paddle on your head and create right angles with you shoulders and elbows, hold the paddle out front again checking the the blades line up with your knuckles.
Forwards paddle, holding the paddle out in front of you, lock off your arms and rotate your chest and core, this is how you generate power. Use your arms to place the paddle at your toes ensuring all of the colour is in the water rotating your core, bring the paddle out of the water by your hips, place the paddle on the other side and repeat. This is a forward paddle.
Backwards paddle, Just the same as the forwards paddle but this time using the back of the blade you will start at your hips and finish the stroke by your toes. Check over your shoulder that you wont bump into anything. This is also how you stop.
Forward sweep, keeping your hands in the same position on the paddle bring your dry hand to your belly button and place the paddle in the water by your toes. Rotating your core draw a big rainbow with the paddle bringing it out behind you. You will turn to the opposite side that you do the sweep on.
Reverse sweep, same as the forward sweep just in reverse, this is a strong turning stroke for the person in the back of the kayak. You will turn to the same side as you do the stroke on.
Capsize - stay with your craft / Flip the kayak down wind and remount
Bring your PFD and paddle back up to The Kayak Shop
Don’t get blown onto rocks or into surf zones, you will get injured.

Phillip Island is a fantastic venue for coastal and offshore sea kayaking with Cape woolamai offering one of the most spectacular paddles in Victoria. Just under 2 hours away from Melbourne it's a perfect day trip or alternatively book some accommodation on the Island and make a weekend of it. That being said it is important to remember that sea kayaking is subject to the wind and tide, it is just as important to know when NOT to go as it is to know when to go. We suggest you undertake kayak training before taking on this paddle, alternatively, you can join us on a guided tour. This true sea kayaking.
Cape Woolamai
Spectacular scenery
Blue water
Paddling in bass strait
Old Granite Quarry
Sea Caves
When planning for this paddle it is important to assess the conditions as this location can be exposed to enormous fetch from the South East, South, South West and swell coming straight off Bass strait. It is important to be patient and choose the right conditions, when you do this it is such a magical paddle. It's even worth have a quick look out at Woolamai Surf Beach via Anzacs Beach Parking to check out the ocean conditions before heading down in to Cleeland bight.
Getting the tide right is the key for the Cape Woolamai paddle and there are a few factors to consider. This is a technical paddle, you are dealing with constriction, sweeping tide and, protruding landmass’s.

Constriction
Constriction is when the tide becomes “constricted” when the environment becomes narrow or shallow causing the tidal stream to increase in speed. At Cape Woolamai the constriction occurs between San Remo and the Eastern coast of Phillip Island (see chart).

Sweep
A sweep refers to the current that flows on the outside of a bend in a river, ocean constriction or protruding landmass. The fastest moving water “sweeps” around the bend while the water on the inside of the bend moves at a slower rate.

Protruding landmass/Eddies
When a headland or promontory juts out into a tidal current, current speed will increase generally towards the most exposed part of the land. Creating a low pressure system or “eddy” behind the protruding landmass (see map)
When paddling Cape Woolamai ideally it will be low tide at 12pm, this allows you to take the tide out around Cape Woolamai and ride it back after lunch. Below is a list of the resources we use when planning a paddle. Remember tides are the rise and fall of sea levels caused by the combined effects of gravitational forces exerted by the Moon, Sun, and rotation of the Earth. Therefore you can find tidal predictions for years in advance.
For San Remo tides check: http://www.bom.gov.au/australia/tides/#!/vic-san-remo

Alternatively you can print out the relevant tidal charts PDF here: http://www.bom.gov.au/ntc/IDO59001/IDO59001_2022_VIC_TP029.pdf
Unlike the tide winds can’t be forecast years in advance. Therefore interpreting the winds for your paddle begins 4 days before you plan to put in and require you to have an understanding of Fetch and Lee. There are some fantastic tools you can use to monitor the forecast wind and make good judgement calls. Here are the resources we use to monitor wind conditions and forecasts for this particular location.

Remember this location can be exposed to enormous fetch from the South East, South, South West and swell coming straight off Bass strait.
MetEye
MetEye, forecast map for Port Phillip bay and Western Port: http://www.bom.gov.au/australia/meteye/?loc=VIC_MW005
Victorian Forecast Areas Map
http://www.bom.gov.au/vic/forecasts/map.shtml
Western Port Local Waters Forecast
http://www.bom.gov.au/vic/forecasts/westernport.shtml
Central Victoria Coastal Waters Forecast: Cape Otway to Wilsons Promontory
http://www.bom.gov.au/vic/forecasts/centralcoast.shtml
The Cape woolamai Paddle begins at the Cleeland Bight accessed via Cottosloe Ave. Cleeland Bight offers plenty of free parking, toilets, change rooms and outdoor showers.

The first leg of the journey takes you past enormous sand dunes towards the old Granite quarry which is a great spot for lunch upon return, it is 2.5km from Cleeland Bight.
If you are unsure of the conditions around this point then the Old Granite quarry offers the ability to stop and take a short walk to peak around the point to assess the conditions.
Once you leave Old granite quarry there are no places to land (we call this the point of no return) until you return on your way back. The second leg takes you out into Bass strait and alongside the magnificent Cape Woolamai. Enjoy stunning views down the Gippsland coast towards Kilcunda, spot seals fishing off the rocks and keep an eye on the skies as sea eagles can be spotted soaring high above. On the perfect day (flat as a tac) you may have the opportunity to reverse into the sea cave for a fantastic photo (only attempt this in perfect conditions). It is 2km from the Old Granite quarry to Gull Island (See map) and an extra 1km to the tip of Cape Woolamai which should only be accessed in ideal conditions. Gull Island offers a great turn around location and photo opportunity.
Once back at the Old Granite quarry it is time for lunch and some relaxation. Enjoy a walk along the beautiful beach or around the point, go for a swim or explore the old quarry.
Once your group is well rested it is a short 2.5km paddle back to Cleeland Bight with tide assistance.
The Cape Woolamai paddle is one of Victoria's best sea kayaking experiences, undertake kayak training before you paddle or join us on one of our upcoming tours.
Are you ready for a new opportunity that provides you working experience while kayaking through the world’s most liveable city?
Based on the bay of Port Melbourne, East Coast Kayaking and Sea Kayak Australia is recruiting qualified kayaking instructors to travel along the open waters and lead tours as the head instructor.
Lysterfield Lake is part of Lysterfield Park, 34km east of Kayak Shop Australia and our Kayak Training Centre.

Lysterfield Lake is accessible from the main entrance and picnic area of the Park. The lake is over 1km long.
Click on the map above to go to Google Maps
Lysterfield Park is a great destination for a variety of sports - there are walking and mountain biking trails, picnic areas and the large central lake is great for paddlesports. You can swim on the lake, but no fishing and no dogs.
Lysterfield Lake is very popular for canoeing, kayaking and stand up paddle boarding (SUP) for the beginner and family or even the higher performance athletes at over a kilometre long ot i a good location for fitness paddling.

Launch area and car parking. Jetty currently closed.
Car parking - drop off zone - drop off your kayak/canoe and park further up so other people can access the water.

A great place for family mini-adventure. Make sure both you and your little people wear a Personal Floatation Device (PFD) - a life jacket / buoyancy vest.

Easy launch area and over a kilometre length of lake to paddle.
Before you paddle we do suggest that you do undertake training with a Paddle Australia Instructor to learn the basics of kayaking.
For more information:
Lysterfield Park - Parks Vic
Lysterfield Park - Visitor’s Guide
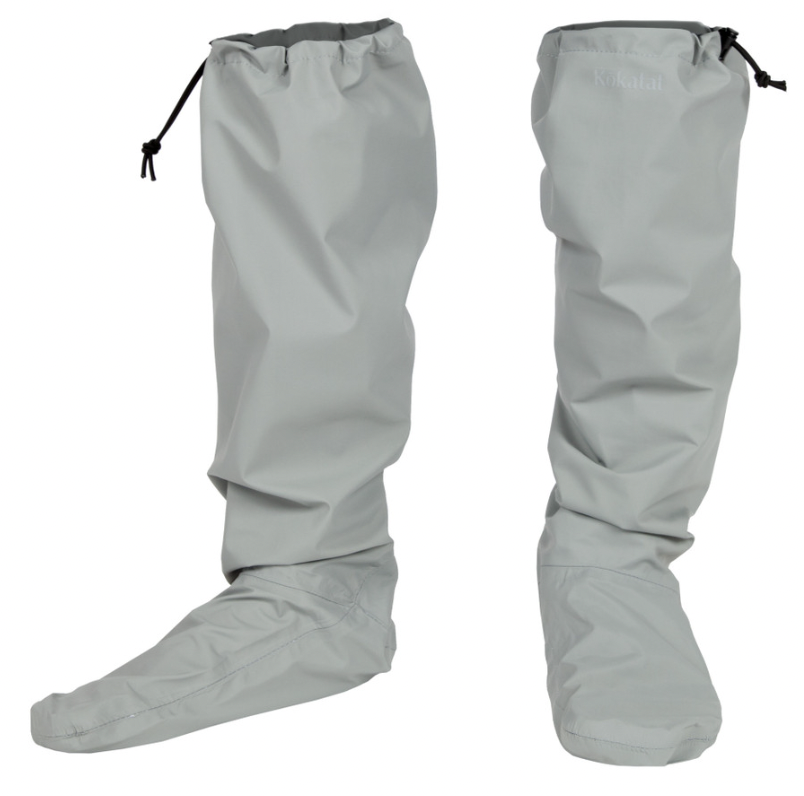
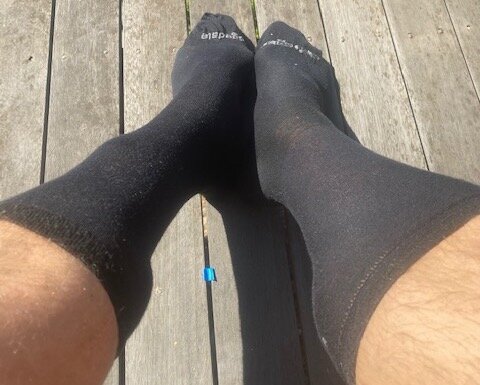
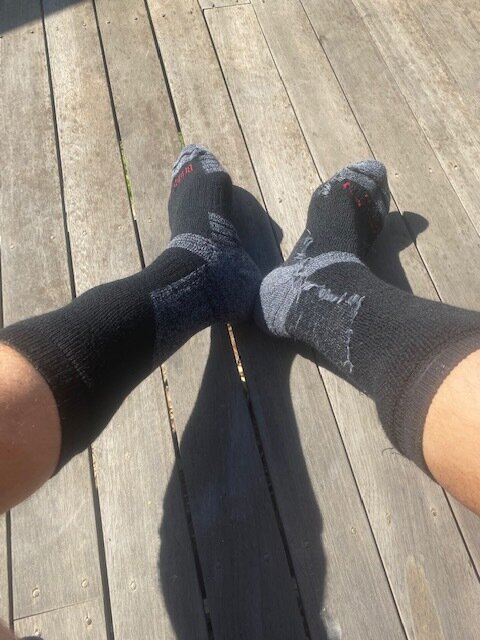
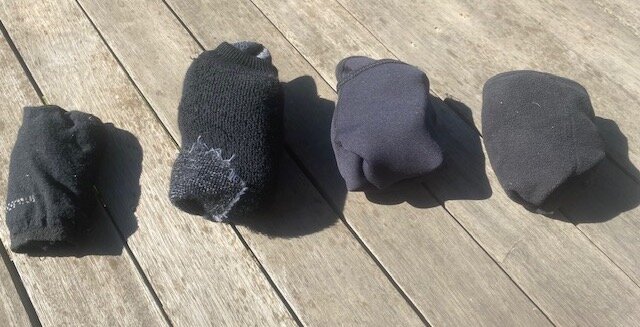
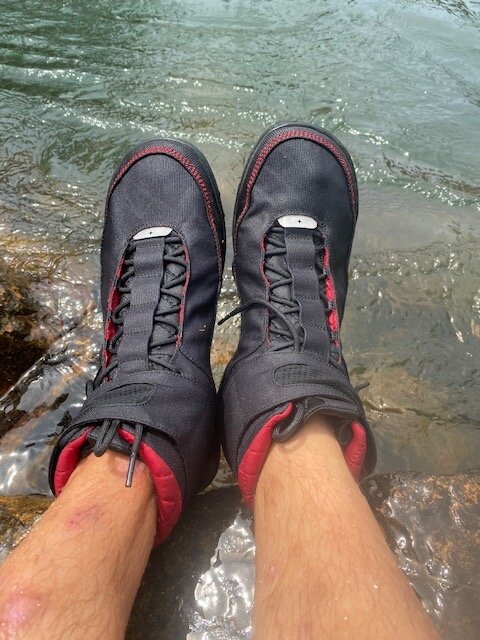
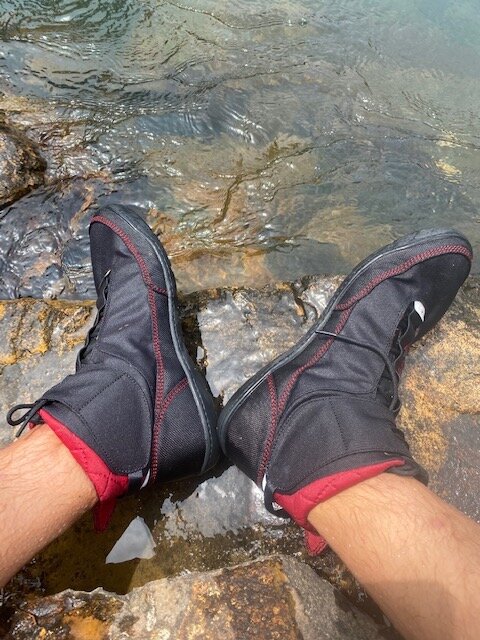
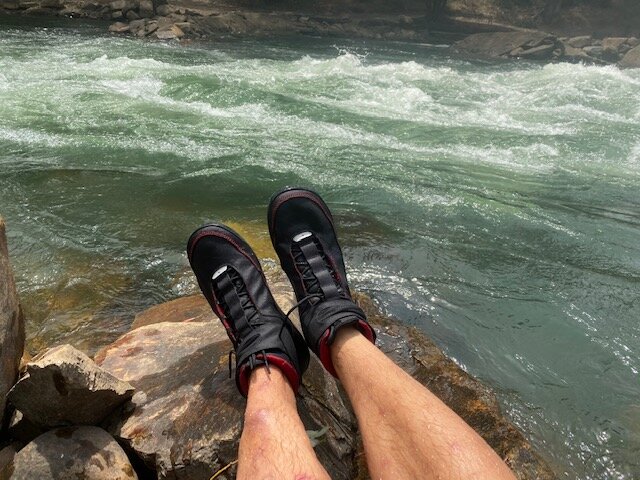
Comfortable feet are a key element to enjoyable water sports. We recommend you always wear shoes but what to wear inside them? Here are four different types of socks I wear depending on where I am paddling and the environmental conditions.
The socks I use are:
Bridgedale Coolmax Liners
Adrenalin 3mm Dive Socks
Sharkskin Chillproof Socks
Bridgedale Expedition Heavyweight Performance Socks


Bridgedale Coolmax Liner
Bridgedale Coolmax liners are tropical weight socks that I use in the Whitsundays and Hinchinbrook Island. They are quick dry, no pong, and most importantly they complete a shield against sandflies, protecting your ankles and lower legs when pulled up high underneath pants.
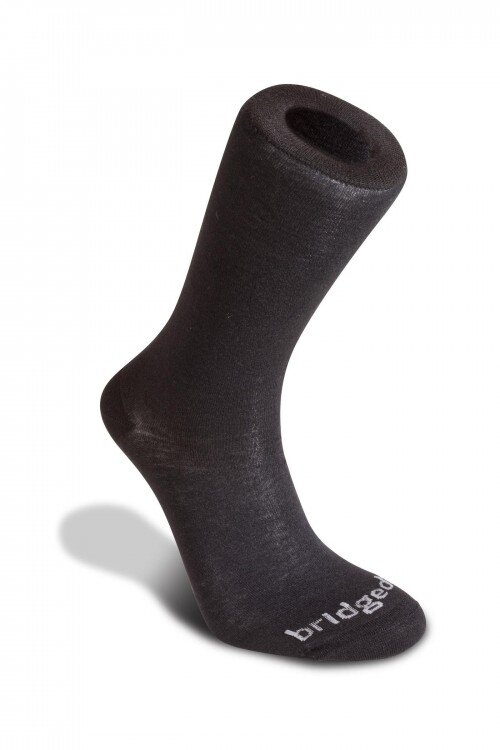


These socks come on a handy 2 pack. Coolmax is a type of Polyester that helps wick away moisture. As a ‘Liner’ they can be used as an inner layer inside your hiking socks when you are trekking.
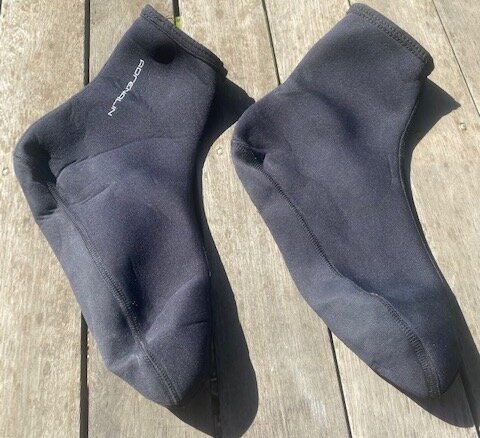
Adrenalin 3mm Dive Socks
These are 3mm neoprene socks, but if you are allergic to neoprene go straight to the Sharkskin socks!
These work inside your kayak shoes just like a normal sock! They work great and I generally wear them with my Vaikobi or Adrenalin paddling pants in my water shoes when I know my feet will get wet. They can get smelly when they get wet but that is quite normal for paddle clothing, but they still stay warm. They can start to get cold after a long day when you are sitting in camp, but then most people would change to warm wooly socks by then.

Adrenalin 3mm neoprene socks
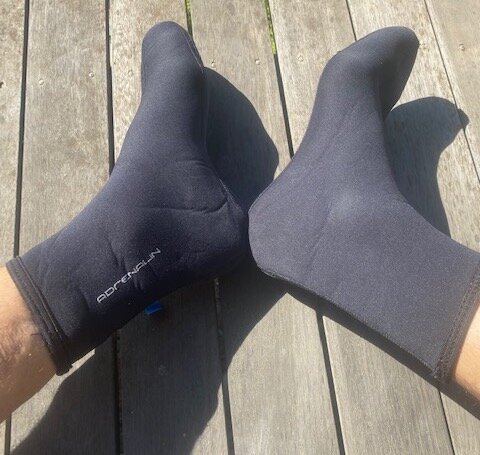
Sharkskin Chillproof Socks
Sharkskin socks work well, but I do commonly go for the neoprene socks if I am definitely going to get wet feet! They are good in combination with dry pants /dry suits. They are warm when wet, but they do get smelly if they have become wet.

Sharkskin Chillproof Socks
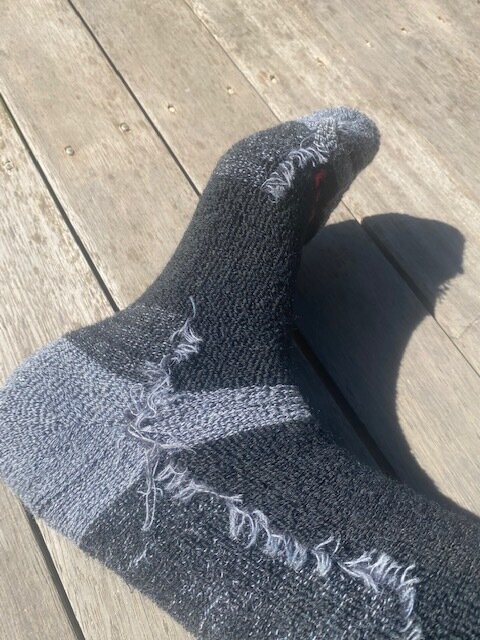
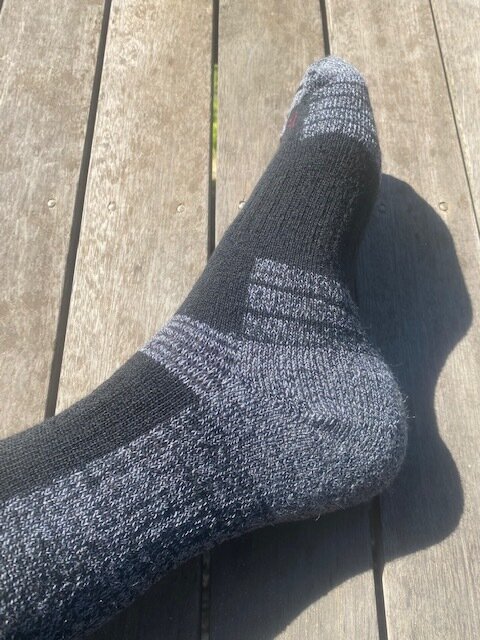
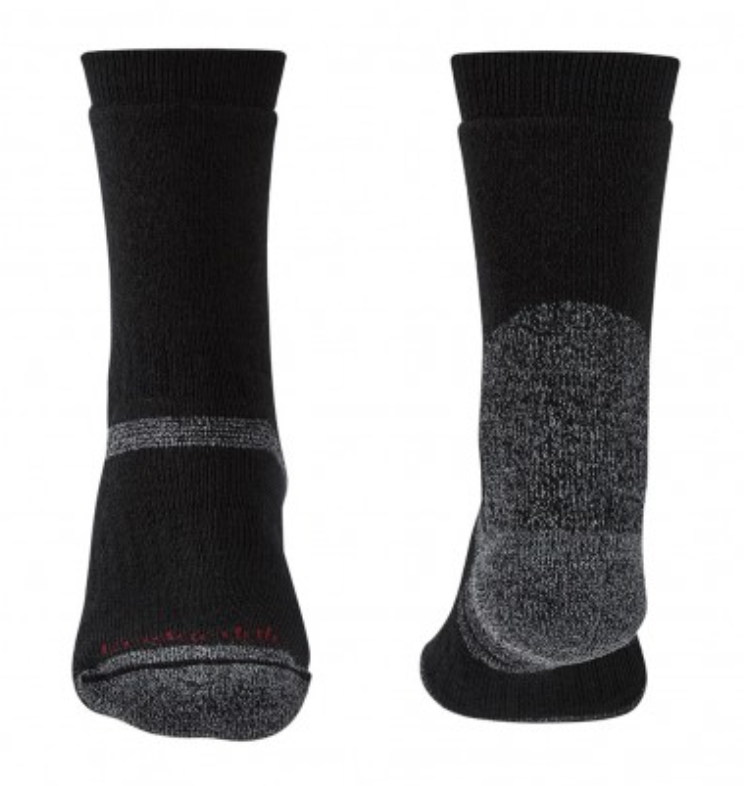
Bridgedale Expedition Heavyweight Performance Socks
Bridgedale Expedition Heavyweight socks are thick wool blend socks are the bomb for my dry pants and dry suit. If you can start the day with dry socks and finish the day with dry socks that makes winter paddling in cold water a real pleasure. Even if they do get wet beneath dry pants, if you get the opportunity to drop your pants and let the water out they still stay warm when wet, which is the key for paddle sports. After a week of paddling they do get a bit smelly.

Between the combination of all these four socks you will be set ready to go and enjoy your sea kayaking with comfortable and warm feet.
These are my thoughts - do you agree? Please comment - what are your favourite kayaking socks?
What did I do before I had a dry suit? Now I cannot imagine paddling or training without my Kokatat Goretex Meridian Dry Suit. If I am going to spend an extended period of time in the water coaching clients it is invaluable.
Who should have a dry suit? Anyone who participates in water sports where the water is cold. A beginner or intermediate paddler will greatly benefit from the boost in confidence and increased safety resulting from staying warm and dry.
The warmth of the dry suit relies on you base layers - fabric that remains warm when wet and dries quickly and can wick any moisture or perspiration away from your skin.
Your level of activity and the temperature of the environment will determine the level of warmth of your thermal layers - generally long sleeve top, long thermal pants and warm socks are a minimum for comfort.
Wash: After every use I hose the suit down (while still in it!) or use the handy outdoor showers on the foreshore. Periodic washing with a good Goretex wash such as Grangers Performance Wash is recommended - cool water, can be by hand or gentle machine wash.
Hang the suit to dry and store it loose. Do not use bleach or dry cleaning.
Zippers: to keep zippers running freely, particularly for when you need them in a hurray, they should be treated regularly with a Zipper Lubricant stick.
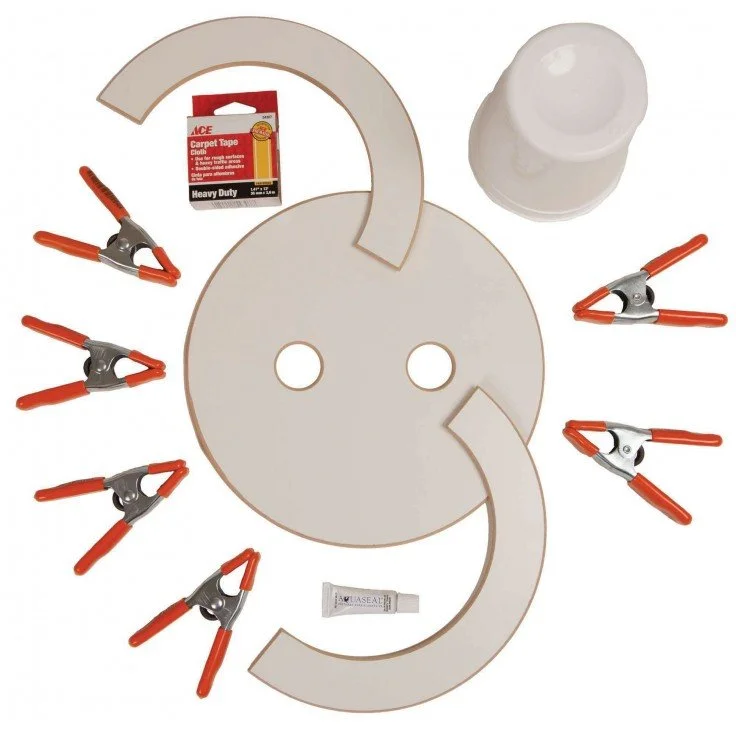
Gaskets: Gaskets start off tight - resist the temptation to trim them and practise stretching them over some neck-sized can or football the night before use. Treat your gaskets frequently with a protectant such as 303 Protectant.
Avoid getting sunscreen or insect repellant on the gaskets or anywhere on the drysuit. Take care of gaskets when putting on the suit and removing it - avoid wearing a watch or spiky earrings.
I get about two years solid use out of my gaskets as the suit gets a lot of use in the course of work. They then need to be replaced. Gasket replacement is best done by a professional, but can be DIY if you are handy, purchasing just the gaskets, or with a tool kit Kokatat has put together. Factory repairs can be organised within Australia.
Socks: To maintain the waterproof-ness of the suit, you need to look after the socks. Take care when changing in and out of the suit - have something to stand on such as a rubber mat to avoid small punctures. Always wear water shoes - you may find that you shoes for wearing with your drysuit will need to be a size larger than you would normally wear. If you do put a small hole in the socks, it can be sealed with Aquaseal.
The Kokatat Goretex Meridian Dry Suit is manufactured in Arcata, California USA. *There is usually some stock available in Men’s and Women’s sizes in the Goretex Meridian, but it is best to check before ordering as not all colours or sizes may be available and will have to come from the USA.*
It is even possible to have a custom suit made for you but expect that this will take a couple of months, depending on the time of year and how busy the factory is.
There is a variety of other styles of Kokatat dry suits, plus some in different fabrics such as Hydrus 3L, imported on demand.

Styles without the double tunnel are available (Legacy Goretex). The double tunnel does pull in the waist and improve the fit for any paddler, but for canoeists, SUP paddlers and other water sports enthusiasts (or people allergic to neoprene as it is possible to leave off the neoprene protecting the latex gaskets - custom build) the Legacy style may be preferred.
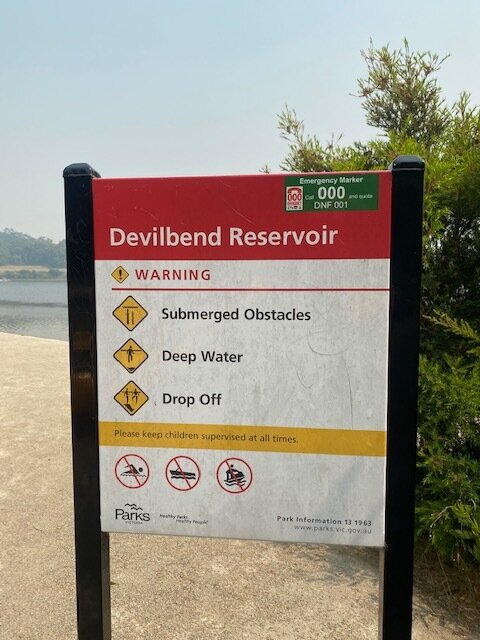
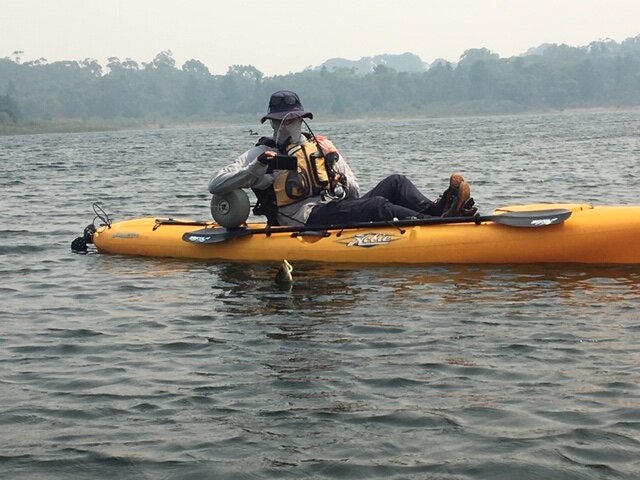
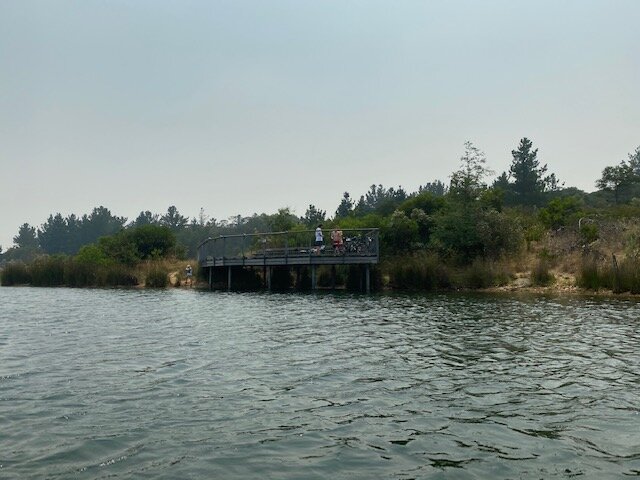
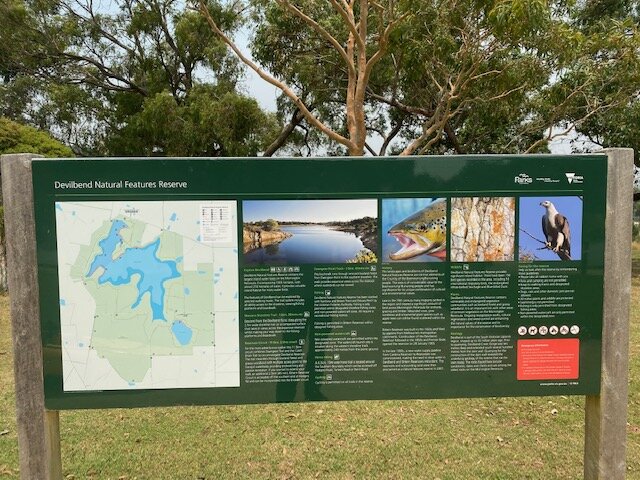
Devilbend Reservoir is an reservoir site on the spine of the Mornington Peninsula in Tuerong, that has been filled with water and now stocked with fish for recreational fishing.
It is within the Devilbend Natural Features Reserve, managed by Parks Victoria.
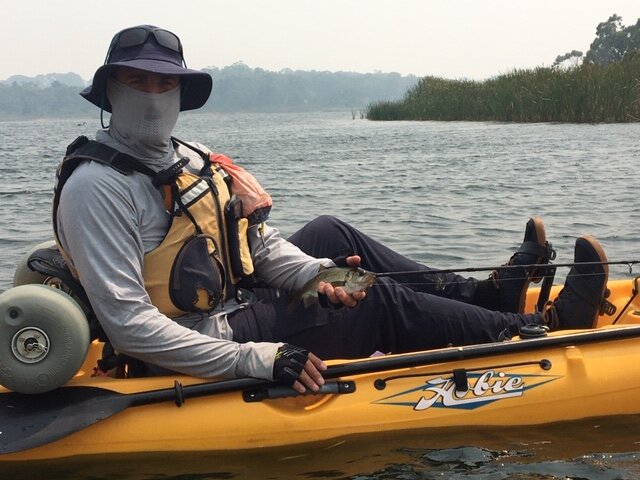
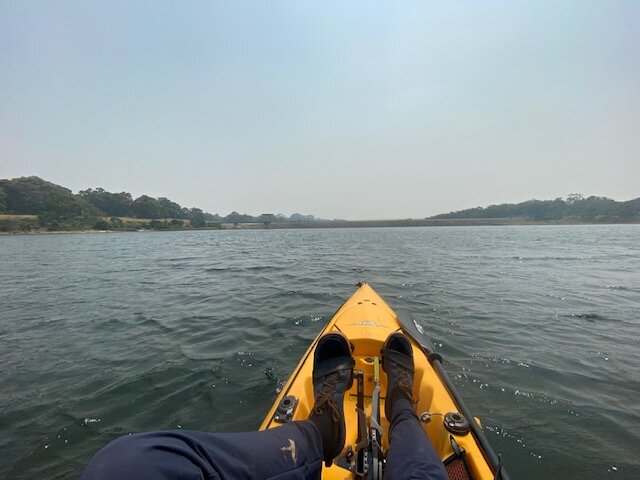
We undertook the short day trip in mid-January on a day initially hazy from the bushfires, to take our Hobie Mirage 13 kayaks out for a blast and maybe even catch some fish!
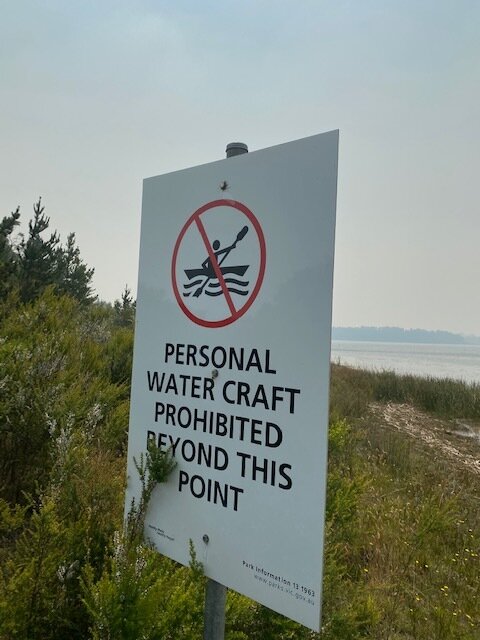
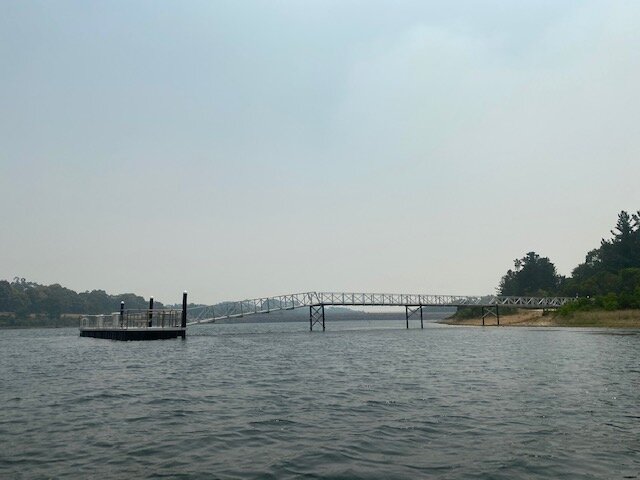
We set up the kayaks and fishing gear then trolleyed down the track to the launch point. The northwestern part of the reservoir designated as the unpowered watercraft area is a couple of kilometres long, though at the far end over the last couple of hundred metres it tapers and shallows into thick weed bed - too snaggy.
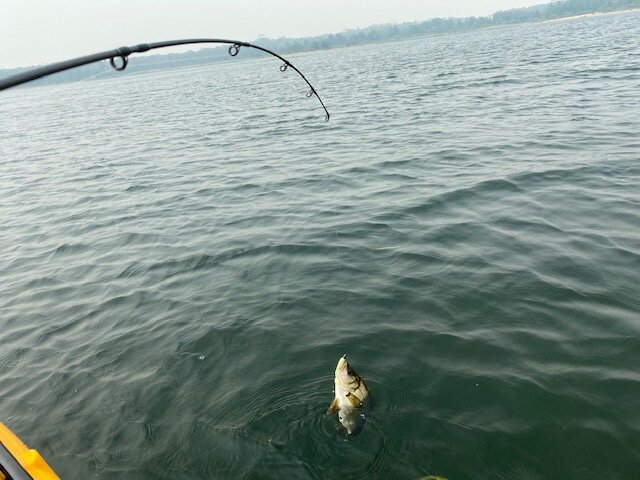
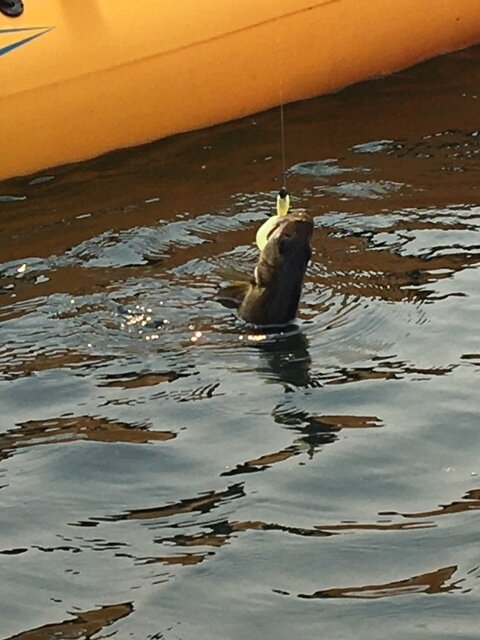
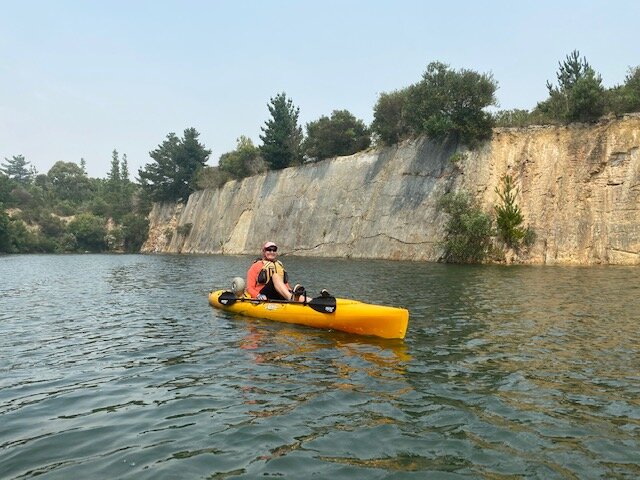
The paddlecraft section (shown as the shaded area on the map) narrows and is marked by yellow buoys. Beyond this the lake widens - on the day we were there an “off-shore” northerly was blowing down the lake. It was back off this point we caught a nice little estuary bream. We paddled back along the eastern shore into the narrow slot of the old quarry (where the stone for the dam wall came from). Being a warm day in the January school holidays there were a lot of swimmers there instead!
Back at the little cove where the launch area is located there were a lot of jumping fish, but not jumping on the hook! Quite a few water birds about and they were maybe having more luck. Devilbend Reservoir is very pleasant day out!


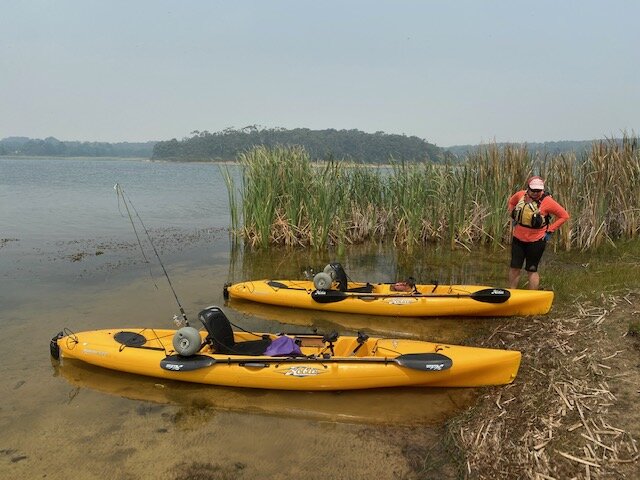


From Melbourne, take Mornington Peninsula Freeway to the Mornington-Tyabb Road, then Derrill Road (follow the signs) to Graydens Road. The carpark has a nice grassed park setting with picnic tables, shelter and BBQs, looking down to the water. It is a hike to the launch ramp, down a gravel track - make sure you bring your trolley! The launch is off a ramp into a sheltered area.
Note that kayakers, canoes and SUP paddlers do not have access to the whole lake - only the arm closest to the launch. A line of yellow buoys clearly states the end of the paddle-accessible section (shaded area shown on the map).
There are some more fishing platforms a bit further around the lake accessible by a walking track. The one inside the narrow old quarry area looks like a good place - others have caught trout and estuary bream there.


Aside from the fishing, this reserve has a lot of walking tracks around the lake and through the bush, and bikes are allowed on the tracks (but no dogs).
The landscapes and landforms of Devilbend Natural Features Reserve are intrinsic elements of the Country of the Boonwurrung/Bunurong people and have cultural and environmental significance.
European settlers in the late 19th Century used the land for farming - orchards and cattle grazing - remnants can be seen of apple trees and pine windrows.
Melbourne’s expanding need for water resulted in the construction of two reservoirs - firstly the smaller Bittern reservoir to the south in the 1920’s, then Devilbend Reservoir in the 1950’s. It was formally opened in 1965. With the construction of Cardinia Reservoir and its pipeline to Pearcedale in the late 1990’s, Devilbend Reservoir was obsolete. Melbourne Water handed it over to Parks Vic and it was proclaimed a natural features reserve in 2007.
Since then, Parks Vic has funded works to improve access and facilities and revegetate the area. Since 2010 Victorian Fisheries Authority has stocked the reservoir with rainbow trout and brown trout.
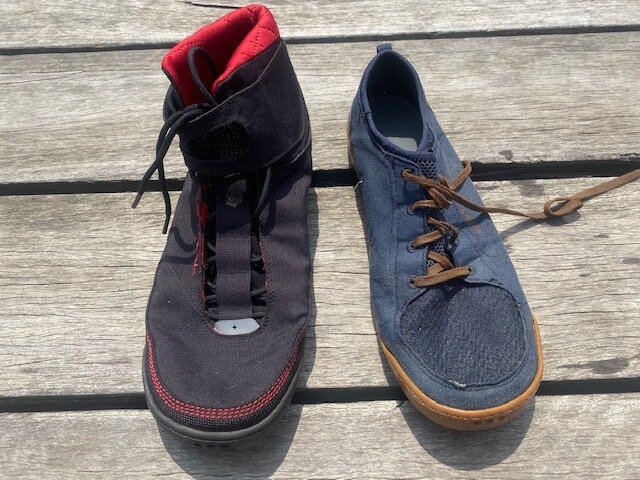
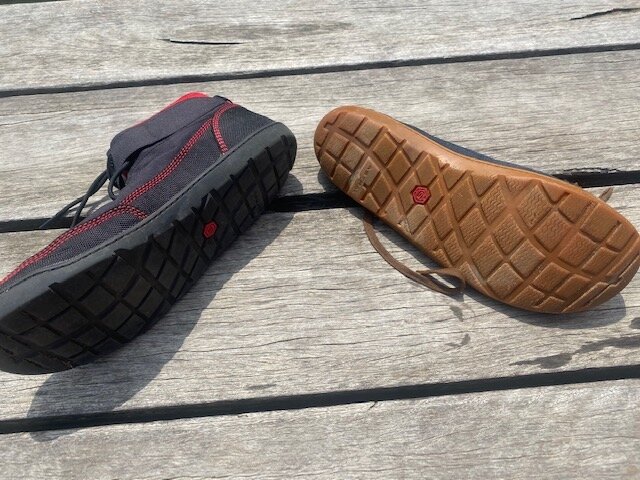
So important for paddle sports, finally I have found Astral Designs; they fit well, steady, dry quick enough, with great grip in wet environments!

The Loyaks have had 2 seasons of hard wear - doing well!
The Loyaks have had 2 seasons of hard wear - doing well!
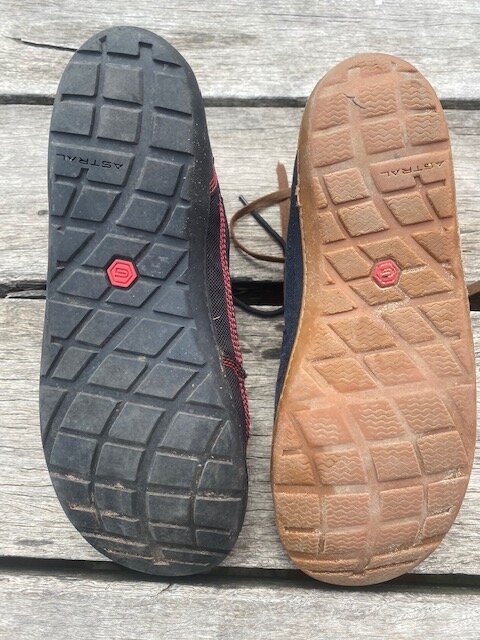
Both with great grippy soles
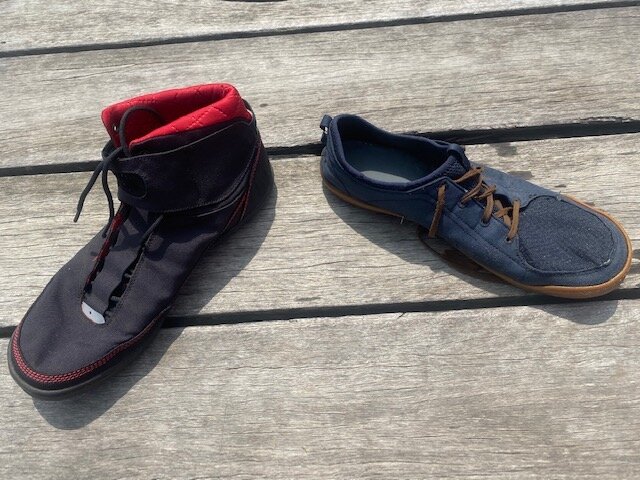
Loving my Hiyaks on the Goulburn!
Loving my Hiyaks on the Goulburn!
Loving my Hiyaks on the Goulburn!
The low cut Loyak - have been using for almost 2 seasons, they are showing a little wear but have lasted considerably longer then any other water shoes I have used in the past, even on a 13 day trip down the Colorado River to top it off!
The high cut Hiyak are great for rivers and ankle support if required, their sole is a little bit more rigid for walking on uneven surfaces! Looking forward to the white water season!
Two thumbs up!

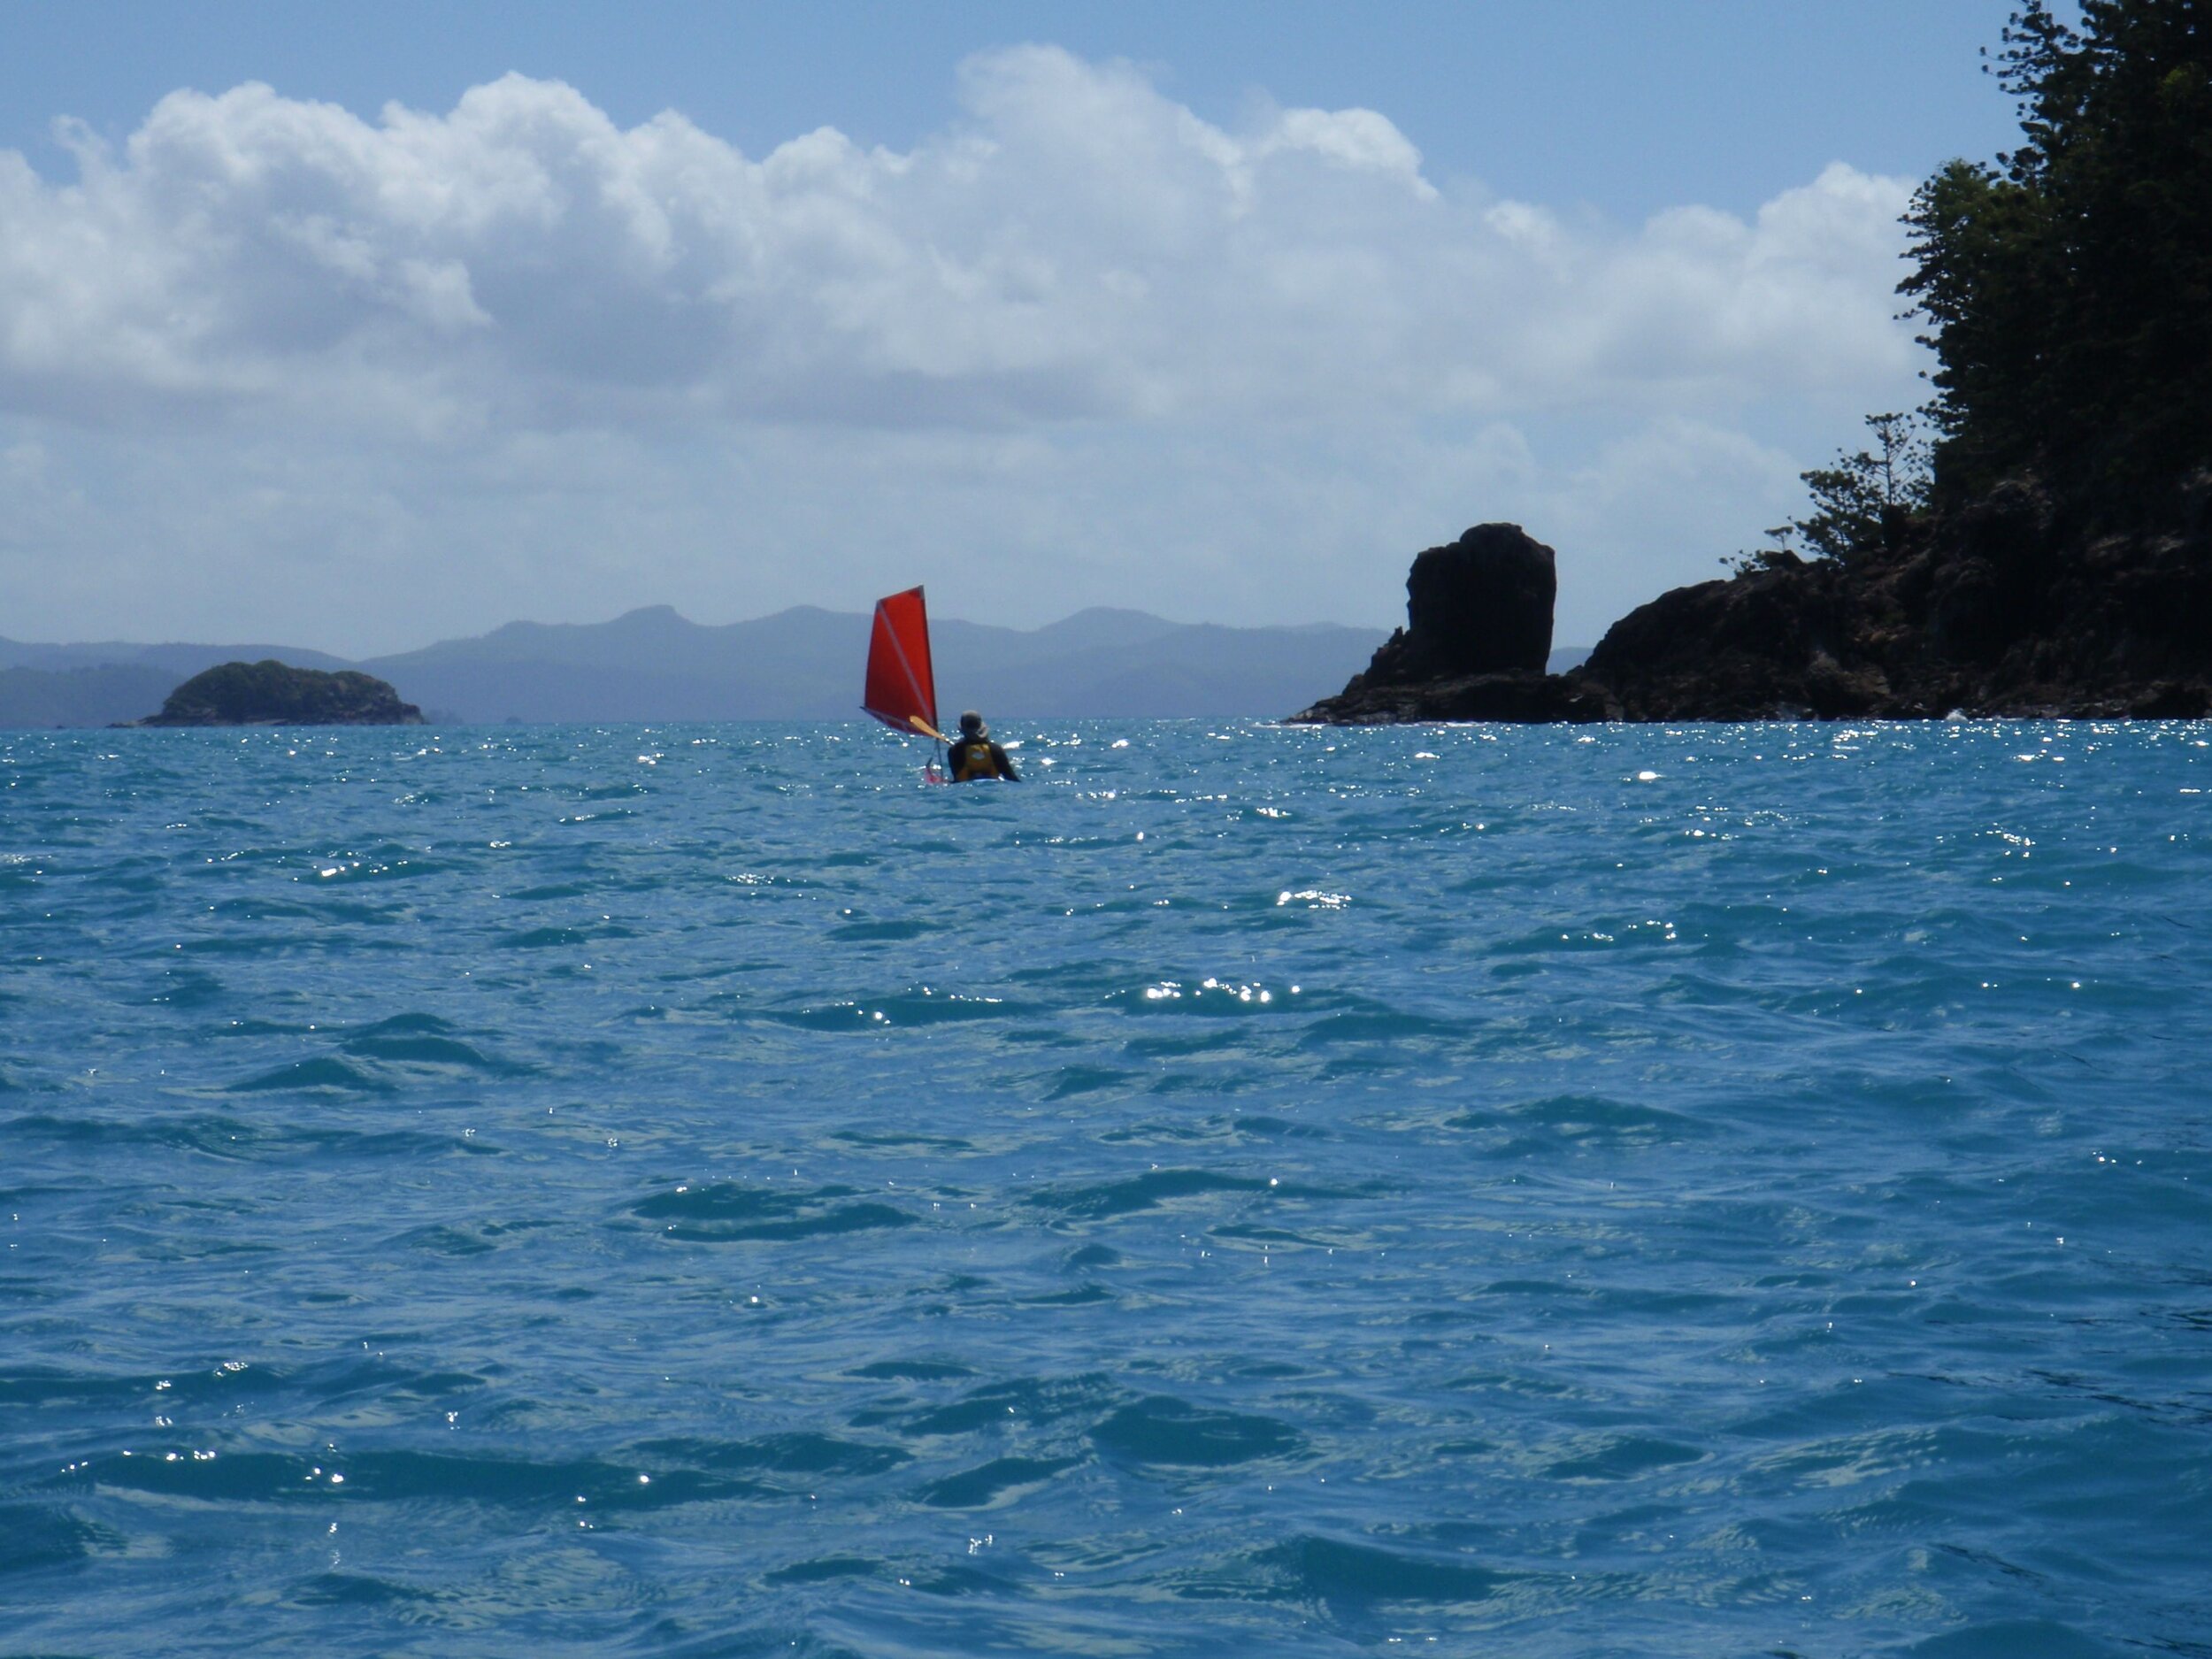
Departing Blacks Beach, Mackay
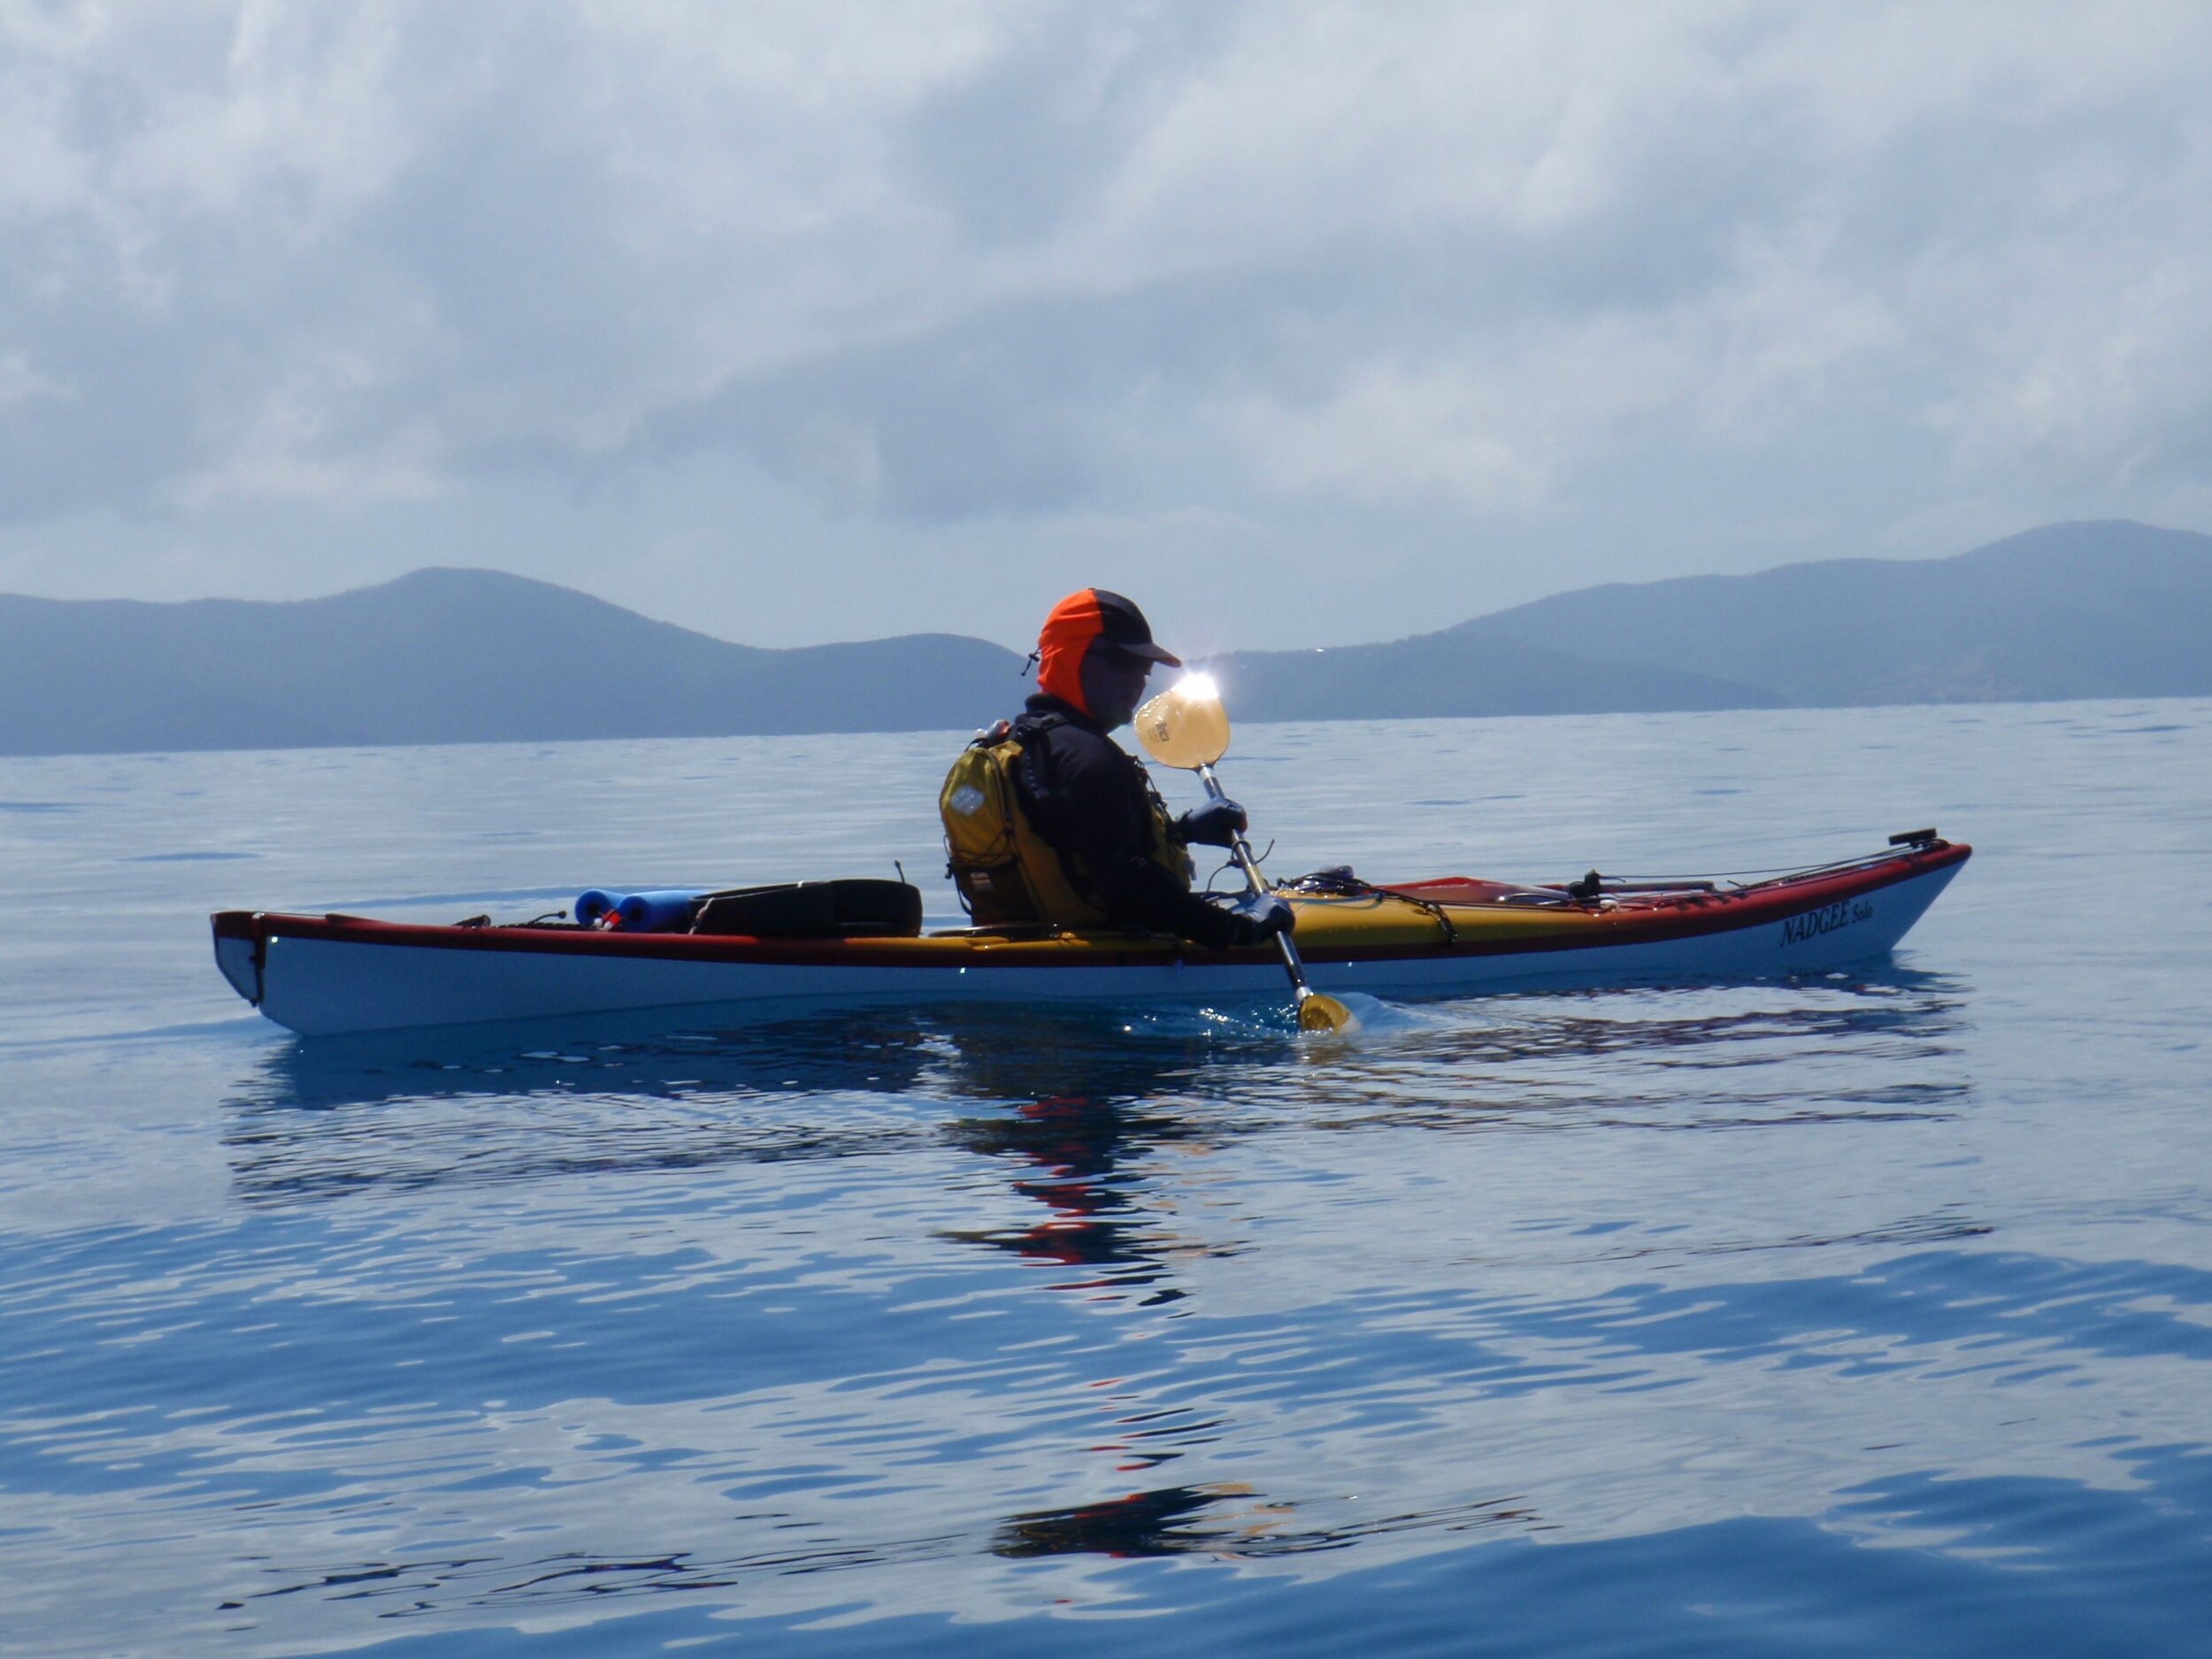
Raia Wall - Nadgee Solo
Neil Brenton - Nadgee Solo
Note on changes since 2009:
This trip was undertaken in September 2009. The aim was to paddle from Mackay to Bowen - taking our time and having a good look around. with Corfelt’s “100 Magical Miles” as inspiration. Since that time most of the resorts where we topped op our water supplies are now closed due to cyclones and the economic times (only Hamilton Island still remains of those visited). We carried 2x 10L & 1x 6L MSR Dromedary bags and a 3L Camelbak each.
We used our own kayaks, but there is also Salty Dog Sea Kayaking who operate out of Shute Harbour - they conduct tours and hire kayaks for trips starting and ending at Shute Harbour. Scamper is a water taxi that can conduct drops of kayaks, food and water.
Since our trip, available campsites may have changed - some have been added and some may no longer be available - see Queensland National Parks website for information and campsite bookings. More walking tracks have been added on Whitsunday Island.
As I arrived at Mackay airport, I was met by Neil, who greeted me with “The weather looks just right - let’s launch tomorrow”. It did look good – the view from Blacks Beach Caravan Park out to Keswick and St Bees Islands looked almost flat, even with the mild afternoon sea breeze and we could see whales spouting out toward the island.
We’d allowed a day in Mackay to get any last minute items, but Neil had already taken care of that, so we decided to go for it a day early.
Arising with the sun, it took a couple of hours to get ready, including satisfying the curiosity of backpackers and passer-by’s, so we didn’t actually launch until 0830, just before the tide was due to turn. Mackay has tides up to 6m range, but we were departing during a time of neap tide and the range was less than 3m, so the ebbing current had minimal effect.
The day was warm and windless. We expected to take around 5 hours for the crossing, passing up the channel between St Bees and Keswick, then around to the campsite (we took 4 ¾hrs to paddle 32km), so we paced ourselves and had hourly food and water breaks. A whale spouting over towards Cockermouth Island, but drawing gradually closer, was an interesting distraction.
The sea stayed flat all the way and eventually we reached the channel – the occupants of Keswick had some pretty nice real estate, but St Bees is basically National Park and is home to a koala colony. We didn’t hear any koalas while we were there so they must live elsewhere on the island.

High tide at Blacks Beach
Glassy seas crossing to St Bees
We did see a number of goats, and were greeted by a dead goat carcass in the camping area on arrival. The campsite left a bit to be desired, being taken over by spiky weeds and festooned by toilet paper from a whole roll carelessly left behind. We picked a sandy area overlooking the beach but better spots may have been behind the dry creek.
Leaving at 0740 for the 17km paddle further NW to Cockermouth, we had a slight headwind. Aiming for a nice sandy area at the head of a bay, we soon found that even an hour after high tide the way was blocked by exposed reef flat, so we went around and soon found ourselves racing the fast-falling water. The camping area is surrounded by a broad reef flat and is exposed from mid-tide. We reached the beach with just enough water to protect the gel coat!
The campsite is basic (no facilities) but very scenic – it would be worth staying here more days than the single night we spent. The afternoon NE sea breeze sighed in the casuarinas and at least 8 whales frolicked offshore during the course of the afternoon.

Sunset from our camp among the casuarinas on Cockermouth Island
Following a trend of leaving even earlier, we departed at 0715, in order to travel before the predicted NE breeze. There was very little wind and we reached Brampton Roads (the channel between Brampton and Carlisle Islands) just after the tide began to ebb. A strong current was sweeping past the island so it was preferable to aim straight for the channel – as it was we had paused to take in the view at the wrong place and realised we were getting swept away from the channel.
Brampton Roads had a lot of coral just inside the channel, turtles and a Long Tom fish that leapt a good 3m in the air in pursuit of a smaller fish. We reached the campsite in 2hrs (13km), located opposite Brampton Island resort. It is the Taj Mahal of national park campsites, with a shelter, many tables, a tank (presently unconnected & empty), gas BBQ (no gas) and toilet tucked away behind a big scrub turkey mound. The snorkelling in the channel was interesting – the coral had long since made way for sea weed and there were a large number of very spiny sea urchins – not to be comfortably undertaken at low tide. The view north to the Smith Group, over turquoise seas, was glorious and swimming off the sandy beach a delight.
The tide went out and exposed a long curved sand flat, along which we strolled with our empties to collect water from the resort (I phoned ahead to organise this the week before). More relaxation ensued and a magnificent sunset before an early night.

View across to Brampton Island

The tide goes out a long way!

Another amazing sunset from the shelter!
With the high tide occurring a bit later each day, we left as the tide was still rising (but not too far out), resulting in a slight wind-against-tide effect, and we finally had a southerly wind and were able to use the sails for the first time (<10 knots ESE). We paddled out to an unusual formation called the Thumb and Fingers, which looked a bit like the Opera House. After the tide turned the seas flattened out, just before we reached the channel between Goldsmith and Linne islands.
We were expecting some current here as the charts warned of tidal eddies, and as we approached the far end of the channel we could see some white water on what had been otherwise flat seas. Quickly packing away the sails, we cautiously approached and realised we had tidal overfalls – standing waves breaking back towards us (into the current). We skirted through the lowest part of this and shot out the end of the channel doing 6 knots, while just paddling enough to point in the right direction! The water was swirling and there were big areas of upwelling.
Around the corner in Roylen Bay, the camping area had a view over another beautiful turquoise sea. Parks had recently mowed a number of clearings in the tough grass for campsites and a track round to the toilet (festooned at night by great big orb-weaving spiders, positioned at head height), but the table promised in the brochure had disappeared. Soon the skies clouded over and we had a couple of hour’s rain and winds gusting down through the gap in the hills behind us. Several yachts returning from Race Week made a run for the shelter of the bay.

Sailing past Thumb & Fingers

Sailing the Smith Group

Storm coming through & sheltering yachts
The weather forecast predicted increasing winds over the next few days so we decided to forgo the rest day on Goldsmith and make a run for the next group of island – the Lindeman group. We departed to cloudy skies and a 10 knot SE wind, and the clouds soon started piling up behind us. The wind began to freshen as we passed the cliffs of Silversmith Island.
Picking up the pace we made a run for Thomas Island and landed at Naked Lady Beach after a very fast last 5km. The clouds parted around us but the winds continued to build, so we ended up spending 2 nights in this former camping area. A large amount of very convenient driftwood planks made handy furniture, but also attested to this beach’s slightly exposed position and we watched the whitecaps marching past the entrance to the bay.
With the storm past, we went for a swim – standing in the water Neil noticed a ropy structure and wondered why someone had left behind a perfectly good anchor and chain. As he reached down I called out “Don’t touch that!” allowing the large stingray, whose tail he was about to grab, to escape. Every time I went for a swim that ray was there, turning round and peering at me with little beady eyes.
The tide fell to expose an extensive reef flat over most of the beach. Big black sea slugs abounded and schools of little fish made patterns as the were pursued by bigger fish.

Landing at Thomas Island

Lurking stingray

Really big sea slugs
After 2 nights the forecast predicted that the winds would return to their more usual 10-15 knot SE, and indeed the caps seemed to have dropped a bit. We ventured out of the bay and into seas up to 1.5m and capping. This was mainly in the vicinity of the first point on the south side of Thomas Island, after that the seas were smaller and the wind dropped right off. Brown gannets hovered overhead and plunged down into the schools of fish as we passed south of Keyser Island.
We sailed and surfed the following sea around the bottom of Shaw Island, then around to the southern side of Lindeman Island where the Club Med resort was located. The friendly water sports staff met us on the beach and we collected some more water and declined the invitation to stay for lunch, feeling a bit untidy and underdressed.
A fast run with the tide up the west side of Lindeman Island brought us to the campsite at Boat Port. There was a tide race on the NW corner of the island that gave us a good ride. This bay is the original landing used during the construction of the resort in the 1920’s – materials were offloaded here and carted across the island. The roads remain as a system of well-maintained walking tracks.
Boat Port camp has a wonderful outlook across to Little Lindeman Island and Pentecost Island (see banner pic above). The serenity is broken only by airplanes flying over to land on Hamilton Island. We arrived at lunchtime, a couple of hours after high tide, and were resting at the shady table when a well-exercised couple ran up and looked slightly surprised to find campers there. We found that people staying in resorts don’t usually realise that camping is possible on the islands and that we were holidaying on $5 per night!
Next day we took to the walking tracks in the cool of the morning, walking up Mt Oldfield to take in the 360 degree views, then spent the afternoon swimming and relaxing with a book.
Rounding the western side of Lindeman Island

View from Mt Oldfield

Packing on the rising tide
By now the high tides were occurring later in the morning – nearly lunchtime, so the carry down to the beach was a bit longer than previous and we were trying to judge where the water would reach in the time it took us to pack. As it was the kayaks had just started to float as we were sealing up the hatches and the banjo sharks (rays) scattered as we paddled off.
Out by Pentecost Island the turtles and dolphins were clearly visible in the glassy seas. We crossed the strait between the Lindeman group and Whitsunday Group and turned past some smaller islands towards Hamilton Island. The further north we travelled the closer the islands appeared and the busier the seas became. As we approached Hamilton Island a noisy jet-ski tour sped past us and we decided to leave the sails up even though we had just passed into the lee of the island – we wanted to be as visible as possible.

Mirror seas off Pentecost Island

Let’s not mix our kayaks up with this hire fleet on Catseye Bay!
Rounding a final headland the hotel towers of Hamilton Island reared up ahead of us like a mini-GoldCoast, in stark contrast to the islands we felt we had almost to ourselves for the past week. Landing in Catseye Bay amid some rather slimy seaweed, we changed into dry clothes and headed into the resort. The main purpose was to wash our clothes, ourselves and collect some more fresh food, since we had by now made a bit of space in the kayaks.
The shops and laundromat are on the marina side of the island and we caught the free shuttlebus, getting a tour of the resort, before realising it was more direct to walk. After the washing, we had lunch out but soon departed – it seemed so crowded after our deserted isles and we didn’t want to leave our kayaks unattended on the busy beach for too long.
We crossed to the Whitsunday side of the channel, initially with a tail wind, but that soon fell and a NE sprung up as we crossed Turtle Bay. The last 5km we spent punching into a head wind, finally round the point into Chance Bay mid-afternoon. A large bombie off the point moved as we skirted it, revealed to be one of the largest turtles I’ve ever seen!
Chance Bay is another idyllic setting; in fact I think it was the most attractive of the bays we camped on, closely followed by Cockermouth Island and Maureen’s Cove. The snorkelling is not a patch on Maureen’s though – Chance Bay is a sandy beach, but is good swimming and access at all tides, and is not a long carry for the kayaks.
The campsite is up on the hillside above the beach – great view but the first step is a doozie! Don’t hang your washing over the railing – the bull ants love damp clothes.
The next day we decided to spend another day at Chance Bay – up until then we had been slightly ahead of our itinerary, but coming into busier campsites it seemed a good idea to be actually on the day we were booked for. We also were suddenly reluctant to move into the busier areas and relished our peace and quiet. At 0700 this was suddenly disturbed by the arrival of Scamper, the inter-island ferry, who offloaded a small excavator and work crew of two men. They moved the excavator up above the tide line then inexplicably sat down for the rest of the day.

Chance Bay

Planes & boats - getting a bit busy
From then on the beach got busy – float planes and yacht tenders landing, plus a couple of tour boats. It seems that Whitehaven Beach – just a couple of kilometres away over the ridge, was a bit choppy and these planes and boats couldn’t land. People kept wandering in to camp and asking us if this was the way to Whitehaven Beach (“No”). Later, after they had all gone, we wandered up to the work crew and asked what they were up to – it turned out they were putting a track through to Whitehaven!
This was the morning we were to paddle Solway Passage, a strait we had heard described as one of the most daunting of the Whitsundays, so we approached it with some trepidation. The forecast was for north easterlies and the tide was flooding from the north until 1230, so in the morning we would have both wind and tide against us, but by the afternoon the wind would be stronger and the tide would be against the wind. Deciding the morning to be most favourable, we departed around 1030, as the current would be decreasing. We snuck around a small island past a delightful little secluded beach, and entered the Passage, keeping as close to the side as possible. We must have picked up an eddy as we shot through against both current & 10 knot breeze, going almost as fast as the small yacht motoring in the centre of the passage!
It was choppy around the corner, then we were around and arriving at busy Whitehaven Beach. We arrived right in the middle of a departing kayaking school group, of about 14 people, mostly in doubles.

Solway Passage - not so bad!

Sun setting over Whitsunday Island
We found a good campsite with a view of the beach and settled in to watch the passing parade – Scamper dropping off and picking up people, and later a large kayak club group arrived and camped further down the beach.
Whitehaven Beach at dawn was much more picturesque and tranquil than on the previous day. As we packed the kayaks we were approached by a women who had hired a sit on top and had been told she could paddle anywhere on it. She wanted to paddle to Chance Bay but seemed unsure of where it was. We explained the unsuitability of attempting to take a sit on top the 8km to Chance Bay through Solway Passage. Apparently we were not the first kayakers to tell her this and she was being picked up that afternoon so hopefully she was convinced.
A light tailwind picked up and we sailed along Whitehaven over crystal clear waters towards Hill Inlet. As we neared, it became apparent there was several boatloads of backpackers dropped off there to relax on the beach and walk up to the lookout. Fortunately they were not in the water, for as we approached the shore several dozen stingrays scattered. More stingrays in one place than I had ever seen.

Relaxed sailing along Whitehaven Beach

Hill Inlet
We landed near a group of young men, and after chatting about what we were doing we persuaded them to help move our kayaks up away from the rising tide. The view from the lookout was amazing and well worth the short walk, though I felt very overdressed (and a bit warm) in my long sleeved paddling gear next to all the shirtless and sunburnt northern hemisphere backpackers – I got a few funny looks!
On returning to the kayaks it was obvious that we has overestimated how high the tide would come – the kayaks were about 80m from the water and our helpers had disappeared. The wheels came into their own on the ‘reasonably’ flat and firm sand and we were soon underway again.
Paddling along the eastern side of Whitsunday Island we again caught up with the school group and stopped for a chat. Then at the top of the island we came across a trio of Western Australians in hire boats who were missing their own boats and having trouble making way against both the tides and the winds.
Passing through Hook Passage with the last of the flood tide we pulled into the low key Hook Island Resort and took a ensuite room as a break from camping. There we enjoyed a lunch and dinner that had not previously been dehydrated, plus a couple of beers. The snorkelling in front of the resort has some very nice coral but is not a patch on our next stop.
Hook Island Resort
We had a leisurely start the next day, in anticipation of the breakfast that was included in our room rate, and supposed to start at 0730. We didn’t want to hang around too late as slack water in Hook Passage was at 0700, so the longer we delayed the stronger the current against us. The staff however, seemed to have other ideas and was clearly keeping ‘island time’ – the mechanic was up but the house staff had had a late night and was sleeping in. Perhaps people wanting a 0730 breakfast were unusual! Eventually he appeared, we ate a hearty breakfast – cereal, fruit, yoghurt, toast – makes a change from a small bowl of porridge!
On our previous trip to the Whitsundays 4 years ago, a frisky little breeze behind us caused us to reach the Pinnacle before slack water and we were committed to rounding it with steep waves standing up behind us – a scary experience to the novices we were then. This time was vastly different – a calm day, no waves, and we were able to play in close to the rocks and pass between them where there was a tiny ‘horizontal waterfall’ only a few centimetres high.
We spent some time checking out the corals in the next few bays before coming around into Maureen’s Cove, where we expected to find VSKC members the Woollards, Chicks and Sharps. We had been exchanging Spot announcer signals with Peter Sharp and felt we would be expected. The camp was very quiet, no-one visible, just the 3 double Sea Bears. Neil went up the beach to the camp, and greeted the group who were engrossed in lunch preparations – and was surprised that Peter flat out didn’t recognise him! Admittedly he was sporting 2 weeks growth of face fuzz and was about 4kg lighter but still!
We spent an enjoyable 2 days with the group, snorkelling, reading and enjoying the sunset over snacks and scotch.

Rounding the Pinnacle in perfect conditions

Rock formation “The Woodpile”
Snorkelling the northern side of Hook Island
With the forecast again predicting strengthening SE winds we moved around to Steen’s Beach the next afternoon (a huge distance of 4km), so that we would have a good view of the crossing to Armit Island. We left in the afternoon as this was when the tide would be approaching high – the reef at Steen’s is not passable when the tide is too low.
By the afternoon the wind was quite brisk and coming around one point a gust nearly blew the paddle out of my hand. With the forecast sounding about the same for the next day, it was looking unlikely we would be departing yet as we had a 20km crossing between Hook and Double Cone Island and didn’t fancy doing it in +20knot winds.
This indeed was the case so we stayed put, to be greeted by the Woollards and Chicks the following afternoon (the Sharps had left 2 days previously to go to Curlew Beach).
Steen’s Beach sunset, looking towards Gloucester Island
John, Annie, Tony and Jill got up extra early to make sure we did in fact leave and went in our promised direction. The tide was almost high and the flood tide carried us out of the channel, then it turned and we had both wind and tide from the SE. It got a little bit lumpy out in the channel but we kept on course for Double Cone and eventually were able to rest in the lee of the island.
The last 7km into Armit Island were less lumpy as the water was a bit shallower. Once again the ‘shortcut’ had closed off a couple of hours after high tide and we had to go the long way around. We arrived before 11am, having done nearly 30km. The campsite is located in a rather picturesque bay with small knolls of soft corals, though the campsite itself is quite bare – quite a dry looking island and the advertised toilet had disappeared. We decided to have lunch early so we sat and ate under a shady tree and contemplated the mainland, which was now quite close, and how we had nearly reached the end of our journey.
Saddleback Island is situated around a peninsula at the eastern approach to Gloucester Passage. The campsite is situated on a small point on the southwest corner of the island and the “100 Magic Miles” book describes it as possibly containing a large number of death adder snakes.

Armit Island - nice beach, but arid camp

Final sunset over the mainland, from Saddleback Island
As we approached it a reef of spiky rock stretched out towards us. It was low tide and still early afternoon so I suggested that if it wasn’t landable on the other side we might perhaps go on. Neil looked a bit doubtful at this suggestion after 44km, but fortunately a nice sandy/coral gravel beach greeted us. The campsite had a nice table under a big shady tree, with views across to Gloucester Island. No death adders disturbed us.
Our final day and we were keen to get going but regretful to be finishing at the same time. The flood tide was either assisting us in Gloucester Passage or neutral and we sped towards the final open crossing.
Bowen is a very low-lying town and is located behind an island, so it was impossible to see 20km out by Gloucester Island. We navigated westward by compass across a fairly shallow body of water and even when we got close were still debating the correct way through. Not until you get around the island can you actually see the town, though some of the outlying ‘suburbs’ are visible to the north and south.
We came in at the marina, which has the patch of sandy, firm mud closest to Harbour Lights Caravan Park. Neil deployed the wheels again and I walked up and booked us into a cabin. We brought up the other kayak and unpacked, then enjoyed a welcome shower and a big pub hamburger, before Neil caught the bus back to Mackay to collect the car – he was back at Bowen by 730pm. Two and a half weeks and nearly 300km of paddling retraced by a 3 ½ hour bus ride!

The route - 13 day’s mostly leisurely paddling
The Whitsundays are a very accessible area for kayaking and can be done as a longer trip like this, or in a very leisurely fashion – you can even get dropped off by Scamper to avoid crossing between islands and can organise food drops.
Time of Year
We left at the end of August and finished in mid-September. This is probably the most forgiving time of year – it was warm, the trade winds are dropping off, but it is not yet stinger season (starts in October) and the bugs weren’t too bad – we had sandflies and mozzies but not march flies.
Note: Since this trip the sharks in Cid Harbour (which we didn’t visit) and Irukandji jellyfish have become an issue.
Weather
Even with the comparatively mild September conditions, you still need the means to forecast the weather. We took a sideband radio and listened to the scheduled weather forecasts each day. Telstra phones worked at most campsites (not on the far side of Whitsunday & Hook) and provided a backup if we needed a forecast at unscheduled times.
(How times have changed! Now we use Meteye - coverage still not available on the far side of Whitsunday & Hook Islands though.)
The dominant weather pattern in ‘winter’ is SE winds, but by September there are some days of NE winds and generally the winds are stronger in the afternoon. Wind direction depends on whether there is a low pressure trough passing or a high pressure ridge extending from a High over the southern states. Most days we were on the water fairly early when the winds are least – between about 0630 and 0745.
Route Planning and Tides
When planning when to leave and when to paddle the tides are very important – make sure you start with the predicted tides for Mackay / Shute Harbour / Bowen as they make a big difference to your comfort landing and departing. Ideally you want to travel around high tide so you minimise carrying your gear. Some beaches are not landable at low tide (Cockermouth, Steen’s) and some will involve a long carry (Lindeman, Carlisle). Most paddling days we travelled on average 16-20km, or about 2.5-3 hours, so leaving just before high tide meant landing just after high tide.
The other consideration concerning tides is direction of the current – the flooding (rising) tide flows south, and the tide ebbs (falling tide) towards the north. The tide range is bigger near Mackay than in the north, so the currents can potentially be stronger, though we were in that area when the tide range was at its smallest (neap tides), so currents only became a consideration through passages and around points or when the wind and tide were opposing.
Once I had an idea of when to go, I plotted the route on Garmin’s Mapsource (now Homeport) software and then downloaded the distances and bearings into a spreadsheet. Adding tide times and heights, I could check that the distances and timing were optimum. I carried hard copy laminated charts (with tide info annotated) and Neil had the route and campsite waypoints uploaded to his GPS.
Water
As the weather was warming up we used close to the full 5 litres per person per day. We carried 29 litres each – 2x 10l & 1x 6l MSR bags and 3l Camelback. Carry water as close to the centre of your kayak as possible – I had the 3 litre behind my seat, 10 litres in the day hatch, 6 litres below my knees in the cockpit (secured by bungee) and 10 litres in the front hatch against the bulkhead (just forward of my feet). The kayak (Nadgee Solo) felt heavy in the water but very stable.
We topped up our supplies at resorts – they were all reasonably welcoming to kayakers except Hayman Island who do not want outside visitors. They were not part of our water replenishment plan. In addition, yachties have desal plants on board and will often offer water, and we picked up several litres from departing backpackers at Whitehaven. In all we probably were carrying more weight in water than was necessary in the early part of the trip but felt secure in our supply.
Food
We ate well and never felt hungry, but we did lose a few kilos each (intended!). Aside from replenishing the cheese and tomatoes at Hamilton Island we carried all 18 days food (plus some spares) without a food drop.
Breakfast - porridge with sultanas, but varied on a couple of rest days with pancakes (Shaker mix – just add water), with dried stewed apricots (soaked in water & heated up).
Lunch – 4 VitaWheat biscuits with tomato, cheese and avocado when we had it, and tuna or salmon when we were out of fresh food. Tomatoes last well if they have the stalks still in them and avocados can travel for a week provided they are not squashed up too much!
Dinner – a variety of dehydrated meals, all based around various mince meats (beef, chicken, lamb) with a sauce and vegetables, cooked up at home and dehydrated overnight. Use mince – very important!!! Strips / cubes of meat do not rehydrate well (a bit like the joke about cooking a galah up with a stone – boil until the stone is done then throw the galah away). Bolognaise sauce rehydrates exceptionally well. If you have beans / chick peas allow a bit more time. We usually started ‘soak time’ at around 4pm for 6pm dinner. The meat dish was teamed with appropriate source of carbohydrate (rice, couscous, pasta, mashed potato). Allow about 150 – 200g mince per person when cooking, depending on your size and how strenuous you paddle days will be (we would have been closer to the 150g). We have been using packet sauce bases in some meals but are now tending towards entirely home-made sauces / flavours. Each meal (for 2) was stored in a ziplock bag – use good quality ones else the sharp bits of dried mince tear holes in the bag and at the bottom of your dry bag you will find ‘pot luck’ a mixed bag of your last few days meals!
Snacks – on the water we had a scroggin mix of nuts, seeds and dried fruit (small ziplock bag size – about 140 - 200g per paddling day). For onshore we had a few luxuries – cheese, tinned oysters, fruit leather (home-made). We also had extra dried fruit medley in case we wanted dessert but were seldom that hungry. The big decision was alcohol – we didn’t take any (Really! Truly!). We just didn’t think we could fit it in or would have to sacrifice food or water. We did have a drink at Hook Island Resort and helped out Annie & Jill with their bottles of scotch – a small tipple at sunset. Generally though it was a mostly dry trip, we didn’t miss it and felt very healthy!
Looking after yourself
On any expedition you need to take care that you stay in good shape and are able to complete the trip. Don’t bite off more than you can chew with paddle distances – even if you are on a tight schedule plan your stages so that you have rest days (it is a holiday after all!) and also can make up time if you have to take weather days.
Look after your back – this means around camp and when moving your kayak. The Nadgee wheels are great but if the sand is soft / beach steep you may have to unload and carry some gear. If you have a very heavy kayak such as a hired double you may need more than two people to carry it empty, let alone full. This may determine the minimum size of your group. We also took ‘noodles’ for use as rollers on gravelly beaches – they were useful at Maureen’s Cove and Saddleback Island in particular and helped to protect the gel coat.
Look after your skin – (1) Bugs – protect yourself against march flies, mosquitoes (there was a dengue fever outbreak in Qld that year) and possibly sandflies. Use long sleeves, pants and repellent. Even so I got a few bites but with a daily Telfast I avoided the usual itching.
(2) Plants – there are stinging plants in the vine forests – it is probably better to stay on the tracks or walk on the beach.
(3) Hygiene – you are unlikely to be able to have a freshwater wash often, but there are alternatives. Getting all the bug spray , sunscreen and salt off each night will help keep your skin healthy, avoid chafing and keep your off water clothes & bedding nice for longer. Wilderness Wash in salt water is one method, but you are still salty. I prefer to use those moist towelettes / facial wipes, though they don’t work on hair! The shower at the marina on Hamilton Island was welcome!
(4) Sunscreen & protective clothing – as you would at home.
Booking campsites
The national parks campsites can be booked on line except at that time, for St Bees & Cockermouth Islands – I had to phone up Mackay or Airlie Beach for those. I ended up booking all mine over the phone with the ranger at Airlie Beach. Campsites were $5 per person per night. Except on Hook Island and Whitehaven Beach we had the campsites to ourselves – at the start and end we were a day or so out from our itinerary, but in the busy areas we tried be there on the day we had booked for. This is particularly important if you are in a big group – some school and club groups were travelling with 10 or more people and tended to overwhelm campsites.
From talking to the ranger, their attitude at that time was that if you can’t be exactly where you have booked due to the weather, then that is better than putting yourself in danger. Aside from the guys working at Chance Bay and Whitehaven Beach we didn’t see any national parks staff, and those weren’t checking permits, but there were rangers about as somebody was trimming the grass and topping up the toilet paper at various sites (& doing burning off at St Bees the week after we were there).
Resources:
Corfelt, D. 2004. 100 Magic Miles of the Great Barrier Reef: the Whitsunday Islands (7th Ed.).
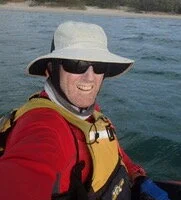
Phil Woodhouse
BY PHIL WOODHOUSE
Lyndon Anderson – Skua
Mark Jennings – Rosco Kayaks, Southern Raider & Paddling Perfection, SeaBear
Stu Baker – Penguin Kayaks, ’Torres’
Philip Woodhouse – Mirage 582
As part of a veteran’s adventure rehabilitation program run by Mates Hero Help and Lyndon, we departed Cairns on July 1, 2019 and headed north for Cape York. Lyndon and Mark had done the trip 16-years ago from Cooktown, but this time we all decided that we wanted to see the Far North Queensland (FNQ) coast from Cairns northward to Cooktown. Having said that, Lyndon had run sea-kayaking trips along this section of coast several times before and was familiar with it and its hazards.
From my perspective, the coast in this region is spectacular. The razor-back hills and tropical vegetation come down to the sea, creating an incredible contrast of thick rainforest with mottled rich dark shades of green, which intersect abruptly a shimmering sea, coloured with contrasting blues, greys and turquoise. By the second day we arrived at Wonga Beach, where Mark and I chose to go on a 500-metre portage over and through a rock garden to the beach and set up camp. Lyndon and Stu decided to wait several hours and just let their kayaks float to the beach.
Under the lush palm trees and vegetation at Wonga Beach, Stu swapped out his Penguin Kayaks ’Torres’ for Mark’s SeaBear that we organised to be dropped up at the location by Dave Sterritt, from Townsville. Mark then decided he would like to paddle the Torres, so he swapped his Southern Raider for Stu’s Torres.

Cape Tribulation

Cape Tribulation
The next day we paddled past the Daintree River mouth and then Cape Tribulation. After Cape Tribulation easy access sandy beaches were a premium because, as can be seen on the charts, there is a rock shelf that guards the beaches and exposes at low tides. The rock ledge with the tides we were experiencing, exposed a wall up to 0.6-metres high. Additionally we were faced with long portages once we got onto of the rock shelves. We found a way through the rock shelf maze near Donovan Point, but found the only suitable camping spot backed onto a deep creek. Looking at the only ideal campsite along the beach, we were certain the creek would be home to a salty. Moving on we approached Cowie Beach in the early evening, but could not get past the 200-metre wide rock shelf that was 700-metres from the beach.
We unloaded the camping equipment from the kayaks and walked back and forwards to the beach, setting up camp while waiting for the incoming tide to float the kayaks past the rock shelf to the 500-metres of sand flats. By 6:30 p.m. in the gathering dark, we had enough water to get the kayaks past the obstructions. We put the wheels on and portage the kayaks across the sand flats to the beach and our tents.

Portage at Cowie Beach
North of Cowie Beach, the vegetation changed from lush rainforest to scrubby dry Queensland bush, but it was still a delight to behold from the water. At Archer Point we landed, however a fisherman’s four-wheel drive vehicle caught fire and set the surrounding grasslands and bush on fire. After tracking the fire’s progress we relocated from our preferred campsite to a position where we would not be trapped by the fire. Moving on, we landed at a beautiful beach at Quarantine Bay then rounded the coast and paddled up the Endeavour River to Cooktown. Until this time, during the days the steady state wind was generally SE 10-knots in the morning and rising to SE 15–20-knots in the afternoon. We had some light rain and overcast days but generally by the afternoon it was quite sunny.
At Cooktown we took a day off to repair two of the kayaks, as they needed fibreglass patching. My kayak had been cracked open at the seam-line, where one of the team accidentally rammed his stern into my midships. Mark by this time had enough of paddling the Torres with its quirks, so went back to his SeaBear. He spent sometime trying to find out how water was leaking into his rear hatch and getting past the bulkhead into his day hatch. He also modified the rear deck to secure the kayak wheels to. Lyndon’s 22-year old Skua was the only serviceable one at this stage of the expedition..
After a morning repairing the kayaks, we sorted our provisions and water for the next major stage to Portland Roads. For this second stage, we took vitals for fourteen days. I carried 39-litres of potable water, mostly in MSR Dromedary bags. I used two 10-litre, one six-litre and one four-litre Dromedary bags as well two-litre and one-litre water canisters. I found the six-litre Dromedary bag, fitted nicely behind my rudder pedal bar in the cockpit and did not become dislodged. Mark used multiple two and one litre soft drink bottles for his water.
Before departing Cooktown a Yachty approached me and informed me that it was blowing 20–30 knots out past Cape Bedford, which was 30-kilometres away. After rounding Cape Bedford we got into the lee of the wind; and here I was informed of a route change. Instead of going around to Elim Beach we crossed over to Low Wooded Island in quite boisterous conditions. Unbeknown to me, Lyndon had lost his chart overboard rounding Cape Bedford with the charted route to Low Wooded Island. After Lyndon consulted the Navionics chart, we set out on a compass bearing into the two to three metre seas with no visual navigation references. Having no visual navigational references, we all knew that we would drift to the west of our destination, but we were looking for a navigation feature. Once we found our reference feature, Conical Rock that was 10-kilometres out from the cape, we were able to work out our drift and make a dead-reckoning correction to the destination 7-kilometres away, that was still not visible. By this stage the Mirage 582’s cockpit was a swimming pool due to the cockpit coaming coming away from the deck: so much for Mirage Kayaks motto printed on the deck: “Expedition Proven”!
At this point I should point out how I like to navigate. I prefer a chart and or map on my deck, of the route and a deck compass. I also carry a Silva baseplate compass in my PFD pocket. I do not rely on my GPS as I had a waterproof device that leaked on one of my Bass Strait crossing, rendering it useless. I still carry a GPS for my check-navigation and plot but turn it on as required. I also carry my waterproof GPS in a waterproof clear bag.
On reaching our destination we searched for a route through the coral to the beach to enable us to launch unimpeded the morning. Next morning we broke camp early and launched at first light without breakfast, so we could get past the coral reef. In overcast and strong winds conditions, we crossed over to Cape Flattery and did surf landings on the lee-shore. After breakfast and several attempts, we all got off the beach and headed for the Turtle Group of islands.
By time we had crossed over to the islands the cloud had gone and the wind had become light. We admired this beautiful part of FNQ as we sat on a tropical uninhabited island looking at turquoise blue waters, white sand and palm trees. The only draw back was that you could not go down to the waters edge. That afternoon we repaired the kayak’s hull damage, which they all obtained on the reef of Low Wooded Island.
We continued north and visited Coquet Island and camped on Leggatt Island. The next day while heading to Barrow Point, my bow pearled and picked up a yellow sea snake. After Barrow Island we followed the coast to Hales Beach. Along the way we saw brumbies and wild pigs as well as many Leatherback turtles.
By day-10, we reached the granite features at Cape Melville and the famous H2O sign painted onto the granite boulder. I first saw this sign in a picture in Wild Magazine in the 1990s and had always wanted to go there. After picking up fresh water, we crossed the 25-kilometres of Bathurst Bay to the Flinders Island Group near Bathurst Head.

Cape Melville H2O
This area had abundant marine life as well as a host of biting insects. On Wurrima––Flinders Island––there are two water tanks and a concrete pad covered area with picnic tables and chairs. We spent a day exploring the islands before starting our multi-day island hopping crossing of Princess Charlotte Bay and up to the Chester River. The small islands along this route predominantly had northerly facing sandy spit beaches and crystal clear water over the reefs. At one island, Mark had a shark wanting to be his friend, as it followed directly behind him along his meandering course for quite some distance and time.
On route to Stainer Island we encountered strong cross-currents. The waters here are funnelled by the large reefs––Stuntip, Grub, & Hedge––that lay to seaward. When we got to Stainer Island and its solitary tree, we discovered that we would be extremely close (one to two metres) from the water’s edge when we set up camp, due to the large tide. Pushing on in the late afternoon we approached another Island. As part of our standard operating procedure for landings, we sat off the beach on the water and reconnoitred the beach and surrounds. On this occasion, we counted multiple large crocodile drag marks up and down the sand. “So”, we all thought to ourselves, “where are they?” In the gathering darkness we paddled to the lee-shore, reconnoitred and landed.
Part of our risk management plan (RMP), was to land and get off the water as quickly as possible. We carried a single axel set of wheels with a V-block midway between the wheels. The wheels on this were made of solid soft rubber that did not need inflating. While one person stood watch at the back of the kayaks armed with his trusty paddle, the other two would attach the wheels to the stern. We would all then wheel the kayaks up the beach. Another important part of our risk management plan was, once getting off the water we would not go back to the waters edge. When it came to launching, we always tried to launch away from where we landed, to avoid repetition and getting ambushed by a Salty.
However, in a psychological attempt to help us sleep at night––since we were so unavoidably close to the water’s edge––we harboured the kayaks between the water and the tents and with whatever vegetation was available, to create a ‘noise’ warning barrier. At night when we moved around, we always swept the area we were travelling to with our torches and informed the others of our intentions.

Pelican Island
The next day we continued on to the Chester River region of the coast. When planning we had considered camping on some of the other islands but they were now all surrounded with thick mangroves. Lyndon and Mark were amazed at how much the vegetation had increased around the islands in sixteen years. This meant that the once viable camping options had become high-risk areas through the presence of estuarine crocodiles.
Of note was one island that had a three-metre high steep sloping soft white sand beach, leading to a flat grassy area that was ideal for camping. Unfortunately for us, there were crocodile drag marks present. Crossing to a place north of Chester River, we lost all wind and associated following sea. We sweltered in the humid heat and ground out the strokes to get across to the coast. As we crossed over to the mainland, we admired the Great Dividing Range in the background, with its isolation and hundreds of kilometres of mangroves and waterways in the foreground. To cool down I did think of rolling my kayak, but in the calm warm water, there was the unknown presence of Irukandji and box jellyfish.
We landed well north of Chester River but discovered the beach backed onto mangrove swamps and the sandy beachfront had numerous crocodile tracks. Heading northward we saw kangaroo, cattle, pig and brumby tacks. As for marine life, there were many turtles. We stayed close to the beach, about 30-metres off, as we reconnoitred for a campsite.

Camp at ?Orford Ness
At this stage of the afternoon the wind was cranking up and the waters were turbid. As we paddled along, a three-metre plus salty was traveling toward us, oblivious to our presence. In hindsight our initial reaction was rather amusing. This encounter had been researched, analysed and plan for, as part of our RMP; but when you have no way to defend yourself from a wild creature there is a moment of uncertainty in the possibilities and outcomes of the encounter. As per our RMP, we closed together and when the animal saw us it sank under the choppy turbid water. We calmly paddled on but looking over our shoulders to see if there was any hint of the creature. We joked that each of us, had a two-in-three chance of not being attacked.

The author, Cape Melville area
With the tide dropping, the wind strength increasing and churning up the turbid water, we landed and floated/portage the kayaks above the high water mark. We unloaded the kayaks and walked a further 200-metres across a sandy wind-swept plain to a windbreak afforded by a large clump of bushes. Tragically from here along the coast all the way to Cape York, was an enormous quantity of plastic flotsam and jetsam on every beach.
The next day, the winds drove us towards the beach even though we were set at an acute angle to avoid the beach. As we yawed along the coast, we endeavoured to give the mouth of the Nesbit River as wide a berth as possible. The reason for this was to reduce the possibility of encountering salties.
At Cape Sidmouth my sail’s stub-mast snapped in two. It had been bent by the winds after we left Cooktown but the loads and metal fatigue cause it to fail in the strong winds. After making repairs we set off, but later Mark encountered rudder issues and my sail tore––as a result of the temporary repair. In the vicinity of Voaden Point, we realized the risk management “lemons” were stacking up against us. Lyndon, who was the only one not experiencing failures, decided that we should land early. We reconnoitred the long expanse of plastic littered beach, for a campsite and found shelter from the wind in the bushes. Here we did repairs to broken items and organised ourselves to continue the adventure north.
Our next destination was Cape Direction. With our now usual strong winds and two-metre seas we approached the cape. The winds dropped a bit, but we had enjoyable clapotis around May Rock and the cape. Landing on the weather shore, which was on the northern-side of the cape, we performed our usual back and forth portage routine without second thought. While sitting up on the hill overlooking the beach a very large crocodile surfaced and cruised past. Considering we were 16-kilometres from the Lockhart River, we were not surprised. This cape has amazing wind sculptured rock formations and fresh water in a reentrant between the two sides of the Cape. Just look at the vegetation and you will see the difference if you ever go there.
Next was a 28-kilometre crossing to Restoration Island. This island was named by Captain Bligh and was his first landing after being chased off the ‘Friendly Islands’ after the Fletcher Christian led mutiny. This is an amazing place. After negotiating three-metre standing waves that were created by both the wind and running tide we landed and were warmly welcomed by Peter, who lives on the island. After viewing the sights of the settlement, we went over to Chilli Beach and met up with Stu and Bridgette.
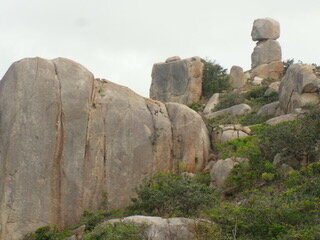
Cape Direction boulders
Because of Stu’s service related injuries he pulled out at Cooktown but then continued on northward to Cape York by road. Here they greeted us with cold beer and rib-eye steaks. We took the next day off and repaired the kayaks. We also picked up our postal packages of food from the Portland Roads Post Office.
After resupplying with ten-days food and water, we set off and passed the WW2 settlement of Portland Roads. We rounded Fair Cape and started looking for a campsite. After 45-minutes of walking up and down the beach we settled back at the spot we first dismissed. By this time the winds were definitely 25-knots and increasing. The sand, whipped up by the wind, grit blasted our bodies and covered our tents, although they were ‘sheltered’ behind the dunes. While trying to find a sheltered spot, Lyndon and I disturbed a Green Ants’ nest in the bushes. After performing the now famed ‘Fair Cape Slap Dance’ we sat down and enjoyed our meals with copious amounts of sand toppings.
Our next leg was a 42-kilometre crossing to Haggerstone Island and Gore Island. On the crossing we entered the Piper Group. This was a magical place with its abundant marine and bird life, turquoise-blue crystal clear waters that magnified the variegated and diverse corals below. Stopping on Farmer Island I was the last one to land.
Lyndon had done the beach reccy and was up on the grasslands that preceded the bushes and trees. Mark was still at the bow of his kayak getting snacks out. After I got out of my kayak and as I was walking through the shallow water up to the bow of my boat, to drag it up on the beach, I felt a powerful thump on my leg and heard the loud sound of a solid object hitting the kayak. In a nano-second my senses heightened and my mind raced as I tried to make sense of what was happening. At my feet, between my kayak and me, was a sandy speckled coloured crocodile. Both Lyndon and Mark also, did not see or hear the animal make its 30-metre dash from the grass, where it was hiding, down to the water. I do not know its length, but its mid-body girth was 35 to 40 centimetres wide. Only after we both departed ways, did I begin to understand what had just happened. The little fellow had come ashore about 40-metres from where we landed, but had moved through the grassland above where Lyndon and Mark came ashore. While Lyndon had walk off up the beach past the reptile, the creature made his dash for the water, but I just happened to be in its direct escape route.
Here is a good place to include our observations about the estuarine (a.k.a. salt-water, salty) crocodile, from this trip. We had all worked in areas inhabited by crocodiles. Before the trip I had done extensive reading and interviews with crocodile handlers. Lyndon had also performed updated research, as part of our risk management plan. A consolidated version of this research can be found in the book Sea Kayaking A Guide for Sea Canoeists.

Croc Watch
In windy choppy conditions, crocodiles see you before you see them. In calm conditions you may only see the eyes and or eyes and nostrils as they watch you. Their skin colour matches the places where they inhabit. The crocodiles around the sandy islands were a sandy speckled brown colour and they blended into the grass patches. Crocodiles around the river mouths and mangrove areas were a darker brown colour. Where there were a lot of turtles, there was always crocodile sign. On Lyndon and Mark’s trip 16–years ago, they only once saw crocodile sign from Cooktown to Cape York and no sightings.
Continuing on with a bruised and scratched leg, we crossed to Haggerstone Island. This island has a private $1300 per day resort. After picking up fresh water and an enormous 1.5 kg lobster tail, we crossed over to Gore Island and looked for a campsite. We had a rest day here as it was an incredible spot and so isolated. I again repaired my ‘expedition proven’ Mirage 582’s faulty coaming but this time I used FixTech Fix2 instead of marine Sikaflex.
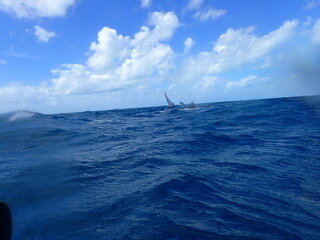
Crossing to Haggerstone Island
During the trip, Lyndon had a tube of Sikaflex rupture in his hands and got the sealant everywhere besides the job at hand. What he discovered was ‘wet wipes’ cleans the sealant off of your skin and gelcoat.
The next leg was 63-kilometres to Captain Billy’s Landing. We rounded Cape Grenville and admired the massive sand dunes that shone pure white like snow-covered mountains. I would have like to spend a day or two here exploring but the group decision was to go on. Crossing over to the MacArthur Island Group we had freshening winds and increasing size waves as the fetch increased. Twelve kilometres into the 22-kilometre crossing my right forward metal rudder pedal cable snapped on my ‘expedition proven’ Mirage 582. All this meant was, I lost the ability to trim out my kayak.
On reaching the group, we crossed a large lagoon with plentiful marine life, including many turtles and sharks. While crossing the lagoon, the tide was dropping and we soon banged our kayaks on oyster-covered rocks. Once we cleared the lagoon we landed on a beautiful high sandy island. I dragged my kayak up and replaced the broken cable and inspected the hull damage. Thinking the hull damage was only negligible I was ready to paddle. Lyndon inspected his kayak’s hull and also thought his boats damage was negligible.
A note about Lyndon’s 22-year old, 17-foot Skua. It was designed by Malcolm Cowell and built by Terry Wilmont. It is a heavy fibreglass and gelcoat layup. This type of construction–in my opinion–far out weighs any gains in lightweight construction methods for expedition paddling.
While I was repairing my ‘expedition proven’ Mirage 582, Lyndon explored MacArthur Island and photographed a Salty’s footprint that was bigger than the span of his hand. This is the same island that Arunus Pilka was attacked on 20-years before.
That afternoon we crossed to Captain Billy’s Landing and landed in the late afternoon. The next day we repaired the kayaks, because when we landed the evening before, we noticed how excessively heavy some of the kayaks were. On inspection we all found holes in our kayak’s hulls. The reasons for the damaged resulted from environmental protrusions through to the gel-coat being worn away in the areas where the bulkheads attach to the hull. The wear damage was especially evident in the ‘expedition proven’ Mirage 582’s thin gelcoat. Because of the construction method, the Mirage 582’s hull had numerous delaminations between the fibreglass and the composite woven mat material.

Kayak damage
Once the thin gel-coat cracked, water seeped into the hatch spaces past the delaminated fibreglass and mat materials.
Other items that failed by this stage of the trip were Pelican Boxes. These waterproof containers were used to house the bilge pump batteries for both the Skua and SeaBear. The waterproof containers leaked. As a result the batteries failed thereby rendering their electric bilge pumps useless. To reduce the chance of pump failure, I have my battery in a Plano Guide Series waterproof case, mounted five centimetres off the day hatch floor on the forward bulkhead.
Seaworthy once again, the next day we set off for Ordford Ness. In strong to near gale force winds we had our bows pointing in a northeasterly direction in an attempt to paddle in a northerly direction. As we yawed along the coast, from my diary I note, that we entered into a confused sea and had waves breaking over our heads. Landing at False Ordford Ness we enjoyed the beautiful secluded beach and rainforest that came right down onto the high-water mark. We roamed the cliffs and found running fresh water soaks. Once again I had water in my front hatch! So the hunt went on to find the points of ingress.
We next crossed Orford Bay. During this crossing my repaired and reinforced stub-mast snapped in two. When I was performing “bush repairs” on the stub-mast at Chilli Beach, I noticed a potential failure mode and sure enough it eventuated. We continued for another two hours or more up the coast before landing. At this point in the trip we all knew how to do a quick repair and re-rig the sail and mast. Within 15-minutes we were back under way heading to Sadd Point. Here the once pristine tropic paradise beach was a plastic rubbish dump.
A comment on stub-masts is appropriate at this stage. I was using the standard stub-mast design that enables the mast, with sail attached, to slide on over the stub-mast. The stub-mast has the stays and up/down-haul halyards attached. The mast and sail have the sail’s halyard. Lyndon normally uses a Tasmanian Storm Sail design. This design is simple in that it does not require a stub-mast and its associated rigging. To raise the sail, all the paddler has to do is lean forward and place the mast through the deck at about the area of their feet––depending on how flexible they are. There is only one halyard and that is on the sail. After some pre-expedition sail experimentation, he chose to redesign the stub-mast to be of larger diameter than the mast. Therefore the stub-mast becomes a moveable receptacle for the sail and mast. This proved to be stronger than the regular design and at no stage did he have any issues in the strong winds with his stub-mast. However, after this trip he is going back to the Storm Sail design. Another big advantage of the Storm Sail is that if you capsize it is easier to discard the sail and self-rescue. The regular design is cumbersome to collapse under water and self-rescue; trust me I know! If you choose to use the standard stub-mast design, replace the rivets with bolts and nuts. Also use thick walled aluminium and or reinforce with stainless steel tubing.
On our voyage to Somerset Beach, we passed Turtle Island on the seaward side. At this stage my atrial fibrillation had set in and I struggled to make-way. Landing on Turtle Island for a break I was feeling exhausted. Wanting to be a team player and not hold up the team, I decided to push on. We proceeded to cross the 21-kilometres to Albany Pass assisted by a following sea of two to three metres. On approaching the Pass, we encountered a tidal race. The chart shows the race as having a 4.5-knot current. Surfing two to three metre waves, we made our way into the pass. At times we all estimated that some of the waves were around four-meters high as we surfed down them. Once inside the pass, we admired the scenery and landed at Somerset Bay for the night.
From Somerset Bay we caught the tide and cruised around to Cape York. Without paddling we were travelling at 13.6 km/h.
After taking on-water pictures, we landed in Frangipani Bay and walked up to “The Tip”. One tourist asked Lyndon where he had travelled from. When Lyndon told him, the man simply did not believe him. Paddling the last 28-kilometres to Seisia we had wind-on-tide then no wind. On the last 18-kilometres section, we saw 11 crocodiles. Once again the crocodiles on the rocks blended in. As there was no wind, the ones submerged up to their nostrils and eyes were relatively easy to spot.
At Seisia we calculated that we had travelled by kayak 1028 kilometres in 25-days. It was a brilliant trip with great mates. If it were not for the abundant stock of “snapping-handbags”, I would recommend this trip. At Seisia we later paddled around some of the islands but noticed a lot of crocodile sign and a 2.5-metre to three-metre croc cruising around. The company Sea Swift generously took our kayaks and Lyndon back to Cairns on their regular FNQ shipping run. I visited Thursday Island and Horn Island before flying back to Cairns.

Approaching Cape York
A note on the not-for-profit, Mates Hero Help. The organisation was started by Lyndon Anderson and Michael Sheehan and provides adventure rehabilitation based sea kayaking activities. These activities are open to current serving and ex-Defence Force Personnel, as well as Police and all branches of Emergency Services Personnel. Adventure based rehabilitation actives are designed to positively challenge participants physically and psychologically. These activities are tailored to place the participants in a controlled, safe but foreign to them environment. It has been found that by facing a safe level of physical or psychological stress, and being pushed outside of their comfort zone, participants regain confidence and self-worth. The activities also build motivation, teamwork and trust and provide the participants with a goal to work towards and a reason to get out of bed in the morning.
Three at The Tip, Cape York